Showing posts with label Prop. Show all posts

Wednesday 15 April 2020

Jessie's Prints: Episode 2 - Alien Cube, The Awoken

This week, I are mostly been printing... 

 An Alien Cubehttps://www.thingiverse.com/thing:1741021

A great prop model and easily worked into any game.  Perhaps it is a magic item, a bomb or maybe the lines are a map or maybe, just maybe, it is a key to unlocking ancient secrets...


The Awoken - https://www.thingiverse.com/thing:1640837  

Another great model for fantasy roleplayers.  The Awoken is labelled as being a 15mm scale miniature but he cuts quite the imposing figure at 30mm scale.  The base is 3inch in diameter so that makes him HUGE by D&D standards and IRL he is 120mm tall so that would make him 24 feet tall.

Nice!

Wednesday 13 August 2014

5 Things I'd Love to do with RPG Props

Here's a bucket list of things I'd like to do with props have effects in a game world. 

Fortune Cookie (may include game content) 
1.  Fortune Cookies - Imagine a game where the PCs have just polished off a nice celebratory chinese meal, when the DM/waiter hands out a plate of fortune cookies.  Each of the players takes one and discovers a clue or instruction to their next adventure inside.

2.  Defuse the Bomb - Make a prop bomb complete with digital timer and hand the players a screwdriver and a set of wire cutters.  I'm going to need to trap them in a locked room so they have no choice but to defuse it.  This is probably the trickiest of the lot as I'd have to find a good timer circuit which I can use. 

3.  SMS Patron - Have a game where all the instructions coming from the patron are delivered to the characters via SMS text to the players mobile phones.

4.  Amaretti Scroll of Raise Dead - This is something I'd like to do when playing a magic user.  When a party member dies, I'd like to pull out a piece of amaretti paper covered in symbols claiming it's a Raise Dead scroll.  Read out some incantation and then roll it up into a tube and set fire to it.  At the last moment the paper will fly into the air (just like in the video) and the character is back from the dead.


5.  Crossword from Beyond the Grave.  Give one or more PCs a half finished crossword puzzle as a clue, preferable found near the body of someone they wanted to interrogate.  The players must complete the crossword to reveal a message from the victim.

Monday 30 January 2012

Spellbooks as Physical Accessories

books
Over at The Tower of The Archmage, Tim posted some inspirational images of spellbooks.  In my campaign world, The Lands of Dual, I've always insisted that players whose PCs are spellcasters, create their own spell books (or in the case of Clerics, prayerbooks) as a physical accessory. 

This fits in well with my preference for the "Spell Slots" form of spellcasting, where as long as the spell is in a PC's spellbook (ie: they have indepth knowledge of the spell) and they have an unused spell slot (ie: they have sufficient energy) then they can cast it.  I also insist that the player come up with their own cantrip or rhyme which they recite when casting the spell.

Although some will undoubtedly think that this isn't very fair on the poor player who has to go to the extra effort of creating their own spell book, hang on a minute, there are a few paybacks.

PAYBACK FOR EFFORT

Mary Queen of Scot's Prayerbook and Rosary
How many times, as a spell casting player, have you had to dive into the rulebook to remind yourself of the spells exact effect or range?  Using this system you can copy out the pertinent stats on a specific spell so you always have your own reference manual.

As DM I can give XP rewards to spellcasters for "roleplaying" their casting attempts.  It's far too easy for spellcasters to get ignored (or just become non combat time specialists) when you're not upfront slaughtering the bad guys and getting XP for combat.

I've always struggled with the notion that if spellcasting characters "level up" in a wilderness, they essentially forfeit any advantage until they can get to a major urban location or meet another wizard to learn new spells and go through the whole "non-game time research" rigmarole which is not always possible to do in a fluid campaign. 

Using the spellbook system, "levelling up" just means that you have had a breakthrough and that you have unlocked another level of mastery.  If you already have, or subsequently find, a spellbook containing spells of your new level, you will now be able to "understand" them enough to add them to your own spell book.  To my mind it is only right that mages should covet each others spellbooks, as a font of thaumaturgical knowledge.  Cue a campaign where mages are being rounded up and slaughtered for their books.

PLAYING DOWN POWER

"But this might make spellcasters too powerful!" I hear you exclaim.  Not so, there are ways in which you can temper their ability, whilst still making it interesting and challenging for them as players.

Environmental factors can make for interesting play.  One of my players wizards had to cast all his spells from the safety of a trapped airpocket inside a submerged boat during an underwater encounter as he didn't want to get his book wet.

More powerful spells require longer incantations (the length of recital should be in line with the spells casting time) and therefore there is a greater chance that they will stutter or fluff their recital.  This gives you the opportunity as DM to be a little bit creative with the resultant spell effect.  Perhaps that level 5 Magic Missile wasn't quite on target or lacked a little concentration?

CRAFTING SPELLBOOKS

There are plenty of ready made notebooks, such as moleskines or the plethora of hand made notebooks, which you can buy off the shelf or from ebay.  Personal organisers (medieval monks used miscellanies which were a kind of proto filofax) also make good spellbooks and have the advantage that you can add pages as you go.  If you're a dab hand with word, photoshop or GIMP  you could create your own page templates and paste in the important data in a fantasy font.

Thursday 2 December 2010

How to: make a Pringles can scroll case

A simple cardboard tube scroll case
As I explained in an earlier post, I'm going to be running a scenario which involves the PCs having a message delivered to them in a scroll case and it needs a prop, so i'll show you how to make one.

You will need:
  • A "Pringles" can or similar stiff cardboard tube.  Ok, so I used a poster tube, but the concept's the same.
  • Faux leather or other material to cover the tube.  Cheap to buy in any haberdasher.
  • Spray-on glue, make sure to check the can to make sure it doesn't contain a solvent which will melt the vinyl.
  • A permanent marker or "Sharpie"
The Instructions:
    Mark your start point then roll - Step 1
    Cut out a rectangle - Step 1
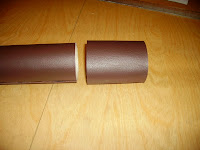
    Mark out an end cap - Step 3
    Roll and glue end cap body - Step 4
    Mark and slash end cap body - Step 5
    Fit end cap covers - Step 6

    1. Place your material on a flat surface and place your cardboard tube on top. Use the marker to draw a line on the edge of the tube at both ends where it meets the material. Roll the tube along 1 revolution until the line on the tube meets the material and mark again. Join up the marks to make a rectangle.  Add a little extra on one long edge and one short edge. Cut section out with a sharp pair of scissors or a very sharp craft knife, be careful not to snag the backing as vinyl leather has a tendency to stretch rather than tear.

    2. Spray the glue onto the material (check the can, as you may have to leave it a few minutes to activate, make sure you do it in a well ventilated room as this stuff can be smelly if not downright hazardous if you inhale the fumes) then carefully line up the tube on one edge and roll along the material making sure that you apply even pressure to prevent any wrinkling, then leave to dry.

    3. Follow the same process you used in Step 1 to mark out another rectangle, this will become an end cap.  Mark out a glue tab and mask off with some newspaper, so when you spray on the glue you don't get any on the inside of the cap.  Optional: The vinyl is pretty thin so if you want a more sturdy cap wrap a piece of thin card around the tube a couple of times to create a sleeve.  Then mark up the rectangle around this sleeve.

    4. Place your covered tube on the unglued part of the tube and roll it up.  It's a good idea to make this part a bit loose to make it easy to get the cap on and off, leave it to dry.

    5. If your tube had a plastic cap use this to mark out two circles of material to cap off each end.  Cut these out and leave to one side.  In order to fix these to the ends of the tube and cap you'll need to cut slashes in the overhang you created.  On the long tube this is simple, on the cap you'll need to slide the cap over the end to create a decent sized flap to glue the end cap covers.

    6. Now comes the tricky bit... Spray glue on an end cap cover (you'll need to do this bit one at a time as it's fiddley) and leave for a couple of minutes to go tacky.  Then carefully attach the circular cover bending and sticking each flap as you go, leave to dry before repeating the process at the other end.  Optional: If you followed the optional instruction in step 3 you'll want to reinforce the end cap with a disc of stiff cardboard like artists mounting board.

    7. Eh Voila! you have a basic scroll case.  You can embelish it with stitching made from string, piping or brocade to cover up the seam lines.
    If you make a scroll case using these instructions please comment and include a picture link, I'd love to see how you got on.

    Next project: How to make an "antique" paper scrolls.