Showing posts with label Make:. Show all posts

Monday 18 March 2024

Jessie's Prints - Episode 39 - Index Card RPG Card Back Stamps

This week, I are mostly been printing... Stamps!!

INDEX CARD RPG CARD BACK STAMPS - Thing 6538692

My recent foray into the Index Card RPG system (ICRPG) involved a lot of DIY card making, which I love.

However, during play this presented a problem in that all my card backs where blank and indistinguishable from each other.  What I needed was a simple stamp which I could apply to my card backs.  

I find it useful to categorise my cards into one of 4 types:

  • People - NPCs, Villains, Bio-forms
  • Places - Locations, buildings, Landscapes 
  • Objects - Things, weapons, loot, traps and trinkets
  • Monsters - Stuff that wants to kill you

This would help me to keep my ICRPG cards organized and reduce seek times to a minimum and thereby make me look like a great DM.

Tinker Cad to the Rescue

My experiments making a plaque for my Cowboy Bebop Swordfish II model taught me that this was going to be easily achieved.  

Step 1 - Make a black and white image in GIMP where black is what you want stamped and white is what you don't want to stamp.  This image is then reversed and saved as a JPG or PNG.

ICRPG Card Back Stamp - Places

Step 2 - Use convertio.co to convert your JPG or PNG into an SVG which can then be imported into Tinkercad.

ICRPG Card Back Stamps - Tinkercad

Step 3 - Import your SVG into Tinkercad and scale it to fit inside your stamp pad.  Make sure that the stamp is at least 4mm high and that you create a backing plate at least 1mm high to connect all the pieces of your stamp together.  Position the stamp so that it intersects with the backing plate and then group the objects together.  Export this as an STL for your 3D printer.  

ICRPG Card Back Stamps - Ready to Slice

Step 4 - Make a wooden backing plate and handle for each of your stamps.  If you get into ICRPG you are going to be making a lot of cards and doing a lot of stamping so this step is essential for long lasting stamps.  I made mine out of some scraps of hardboard I had laying around and I glued some pieces of old broom handle onto the backing plates before supergluing my stamps together.  

You could of course model the whole thing in Tinkercad.
 
ICRPG Stamps - DIY Handles

Step 5
- Stamp Away!! - I bought some cheap stamp pads from AliExpress less than £1.50 each and they have lots of different colours to choose from so you can have a different colour for each card type.

 
ICRPG Card Back Stamps

Buy Me a Coffee

I have shared the stamp patterns on Thingiverse, so if you like them, download them and print your own card backs.  Support the channel and please leave a tip in the jar or use the paypal tip link.   

Saturday 16 March 2024

1:30 Scale Nax Fishing Vessel - NTKJ MODEL - Part One

In my recent foray into buying modelling supplies from Wish.com I mentioned that I had ordered a little wooden boat kit but that the order got cancelled.

Needless to say, I found a different seller on AliExpress and snapped it up.

This is a fun little kit and my first foray into making a wooden boat with a planked hull.  I made a balsa wood sailing yacht from old model engineering plans, decades ago with a lot of help from my dad, but I can't remember if we ever finished it.

The NAX Fishing Boat or should I say NAXOS Fishing Boat

The inspiration for this model is clearly that of a mediterranean coastal fishing vessel of which there are many models.  The kit is made by NTKJ Model and sold through various etailers.

Naxos fishing boat models

This is plenty of inspiration for me to commence making this kit.

Meet the Parts

The kit comes as a set of 6 laser cut wooden sheets, a couple of dowels for the mast and a reel of cotton for the rigging.  A set of pictorial instructions with quite well translated text completes the package which cost the grand sum of £5.94 which in 2024 money is less than a Big Mac meal.  

1:30 Scale Nax Fishing Boat - The Parts

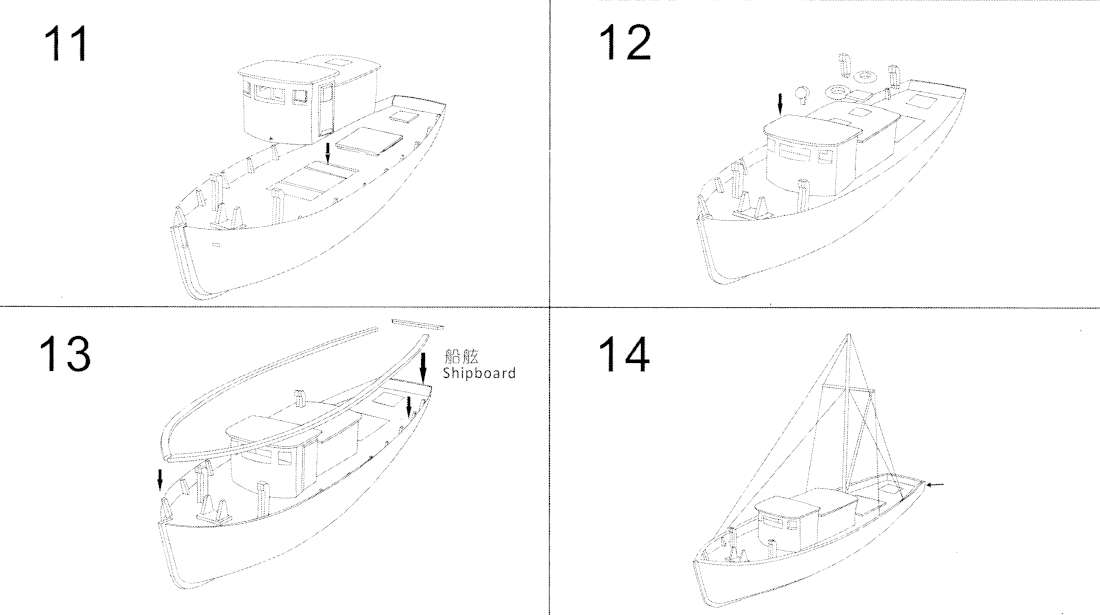
Steps 1-4 - Making the Deckhouse

Whilst the first 4 parts seem fairly self explanatory and involve removing the deckhouse parts and assembling them, the parts are not numbered.  There is a disparity in the plans, in particular the inner bulkhead seems to have a large notch behind it which intimates a part fits into it but the instructions offer no assistance as to what goes in here.   

NAX Fishing Boat Kit Steps 1-4

The wheelhouse fits to the deck with 6 pegs and matching holes.  Dry fitting the parts to the deck helps keep the wheel house square and stable whilst gluing the instrument panel back wall and the top visor.

I left the roof unglued to enable me to paint the inside and out and to glaze the windows and doors with acetate.  

NAX Fishing Boat - Wheelhouse - Steps 1-4

This model is ripe for replacing some of the clumsier laser cut parts with 3D printed ones.  In particular the boat has some cowl vents which are made of laminated wood but they look awful and it will be so much easier to find some on the web or even scratch build.  The same can be said for the portholes and life preservers.  

  • Cowl Vents - Cults 3D - A collection of vents of different shapes and sizes.  The two large vents at the front of the boat are 20mm tall and the one on the rear of the wheelhouse is 10.3mm tall. 

  • Life Preservers - Thingiverse - A good looking life preserver model.  You will need to print six, two at 10.5mm across and four at 12.5mm across.

  • Boat Anchor - Printables - This anchor seems to have the same shape and dimensions as the wooden one.  However, the model is huge and will need to be scaled down to fit.
  • 3 Bladed Screw - Thingiverse - This will need to print this on a resin printer at about XX scale  The original prop is about 11.5mm in diameter.

Steps 5-8 - Laying down the keel 

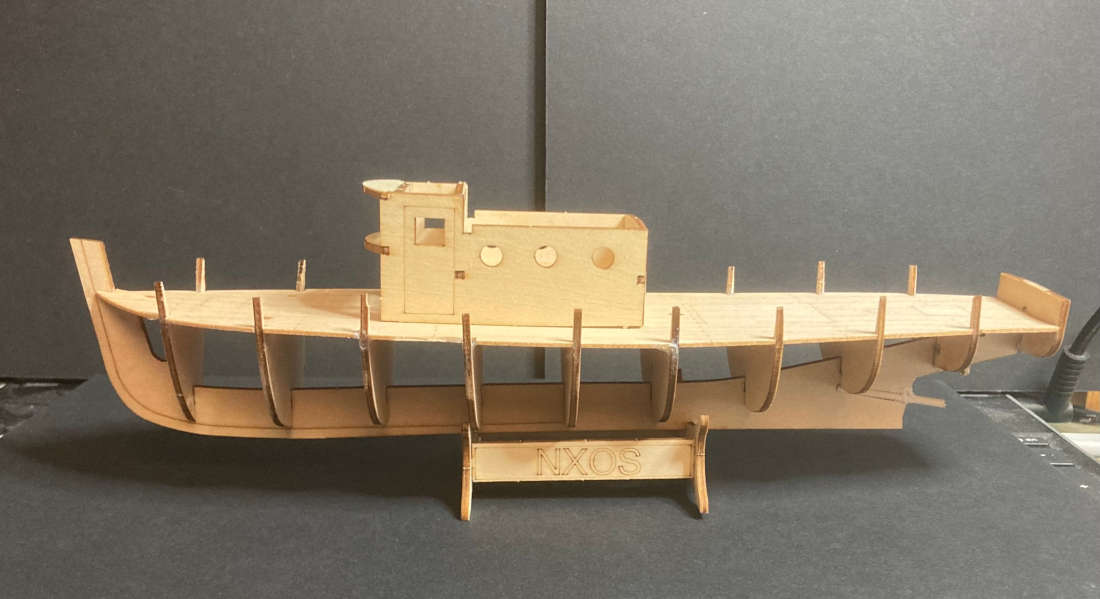
Now the serious work begins.  The frames are all numbered and from 1 to 10 and are slotted into their corresponding slots in the keel.  Be careful when removing theframes from the sheet as the protruding sections are prone to breaking due to the orientation of the wood grain.

NAX Fishing Boat Plans - Steps 5-8

The diagonal slot at the stern of the boat I thought might be for the stern tube but there was no mention of it on the plans.  The kit comes with two diameters of dowel.  The thin one should be for the stern tube and it is a good idea to add a 1¼ inch length at this point as the keel is relatively thin and likely to snap as you insert the frame 8.  Ask me how I know...   

You could add the rudder at this point but the stupid thing has one mission in life and that is to snap.  It is much better to leave this until after you have planked the hull and either fit it or replace it with a 3D printed part.

Once all the frames are fitted you can add the deck plate.  Before you do STOP! 

Take the time now to add some cardstock or a thin piece of styrene to the back of the deck plate.  It is incredibly thin and the laser engraved planking makes some of the edge planks prone to detatching.  The slots that the frames fit in are also too thin and not in exactly the right places for the frames to slot into so you are going to have a whale of a time gently coaxing them into place and you will probably snap a few.  Don't panic.  Take some time out to put the stand together and have a cup of tea.  

NAX Fishing Boat - Steps 5-6

The next step is the one I've been both dreading and looking forward to in equal measure.

Steps 7-8 Planking the Hull

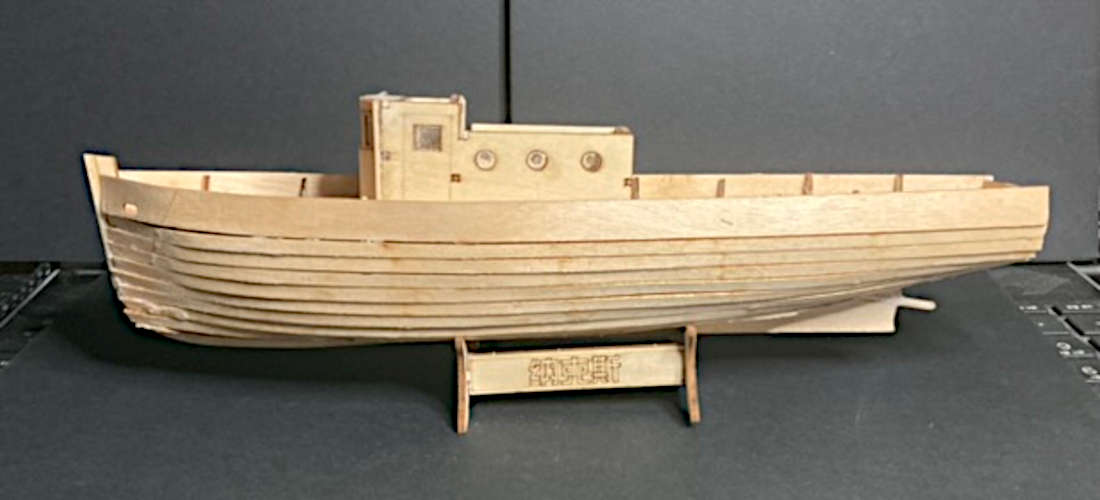
That kettle you just boiled is going to be handy.  We now need to steam the first couple of planks.  These are the wide ones with the little oval holes on the planking sheets marked IV.  The holes go at the bow (the front) of the boat and you will need to hold the end of the plank in the hot steam to soften it and then gently put a curve into it. 

This is incredibly fiddly so be patient.  With these straight planks being made of plywood they really aren't made to go around these curves.  I glued 8 planks down from the sheerstrake (the wide one) and then the remaining planks up from the bottom.  These all had to be shaped at both ends to fit.

Nax Fishing Boat - Steps 7 to 8

There will be lots of gaps.  When we shape the hull planks by sanding we are going to use some wood filler to fill in the gaps.  Real wooden boats have caulked seams and they are designed to swell when they get wet and thereby get tighter.  The hull is going to be painted so you won't be able to see the seams.

More 3D Printed Accessories

Fisherman with ships Wheel - Thingiverse - I spent a long time trying to find a suitable helmsman for my boat and this one conjurs up the same vibe as the Lovecraftian fishing horror game Dredge. be

To be continued...

Monday 26 February 2024

Can You buy Good Hobby Products from Wish.com in 2024?

Earlier this month I blogged about my experience buying hobby products from AliExpress in 2024, this time I turn my attention to Wish.com.

104pcs Simulation Static Grass Tufts Model Mini Grass Cluster - £4.06

My basing game has been pretty weak of late.  Trix Robot Rider needed some desert vegetation to add a little va va voom so I chose these mini grass tufts.  Herein lies the problem when you are buying stuff from Wish, you are entirely reliant on the chinglish descriptions that the vendors provide.  They often list multiple pack sizes or products in the same listing and sometimes it's hard to know what you are buying.  

The upside is of course at these stupidly low prices you can often order multiple different options all for less than the price if you were to go to a big box retailer like Hobby Craft.  If you want to try out a hobby product for not much outlay the online vendors on Wish.com are a fairly safe way to do it.

Mini Grass Tufts

These tufts are quite small and measure 5mm in diameter.  This might be what the number 5 on the box refers to.  In their defence it does say mini... 

I added a few of them to Trix's base and I really think that they add a certain something.  

Trix Robot Rider

Perhaps on a smaller miniature base they would have much more impact.  I will try to buy some bigger ones in future. 

50pcs DIY Craft Party Alligator Clamp Wire Clip - £3.74 - 3/5

I had seen GroundAffected suspend his resin parts for priming on these alligator clips so I bought a bag of 50.  To be honest the clips are not really strong enough to safely hold larger parts but for small 32mm miniatures they are going to be a godsend. 

Alligator Hobby Clips on Wires

There are obviously 2 parts to any painting jig, the thing that attaches to the bit you are painting and the thing that that thing attaches to, lets call it a base.  Having a sturdy base is just as important  

Margot Kidder Superman "Who's Got You?"

Clearly I am going to have to design and print some sort of hobby clip base or print out something like this Alligator Clip Stand by retro-stingray.

If I were buying again I would opt for longer wires as I think the ones I bought were mainly designed as table card holders.

60g Six Colour Flock Adhesive Nylon Static Grass Powder - £2.51

Wow this is great value considering a similarly sized bag of grass from a well known retailer is 3 times the price and only comes in one colour.  I now need to build a static grass applicator like Luke Towan  

Static Grass

UV Resin - 50g UV Resin Ultraviolet Curing Epoxy Resin Crystal Clear - £1.28 5/5

I have wanted to try out some of this clear UV resin for a while.  I have a large bottle of the stuff for my 3D printer but it doesn't set quickly enough when making things like pools of lava or green ooze.  This little bottle was cheap enough that I don't care if it works that well.

I am glad to report that it works really well, just 5-10 seconds under my pretty weakass UV torch and it sets rock hard.  I have a big lava base project in the works and this will be just the ticket for greating that glossy flowing lava.

A DIY Funny Wooden Sailing Boat Model Kit 1/50 Scale Ship £5.42 - 0/5

I would love to say that this is an amazing model and a fun way to spend a Sunday afternoon, but I can't.  Sadly the vendor cancelled the order unilaterally.  This happens from time to time on Wish.com, often when the price is too good to be true.  

I've seen this kit on AliExpress so maybe I'll try another order... ooh a stirling steam engine!

Monday 19 February 2024

Can you buy good modelling accessories from AliExpress in 2024?

I have been playing Wish and AliExpress bingo for a while now.  It can be a dangerous game, but if you've got a few quid that are burning a hole in your pocket, there are worse ways to spaff it up the wall. 

Now this isn't one of those exercises.  I genuinely needed some specific items and thought I would put each store to the test.

AliExpress Modelling Accessories

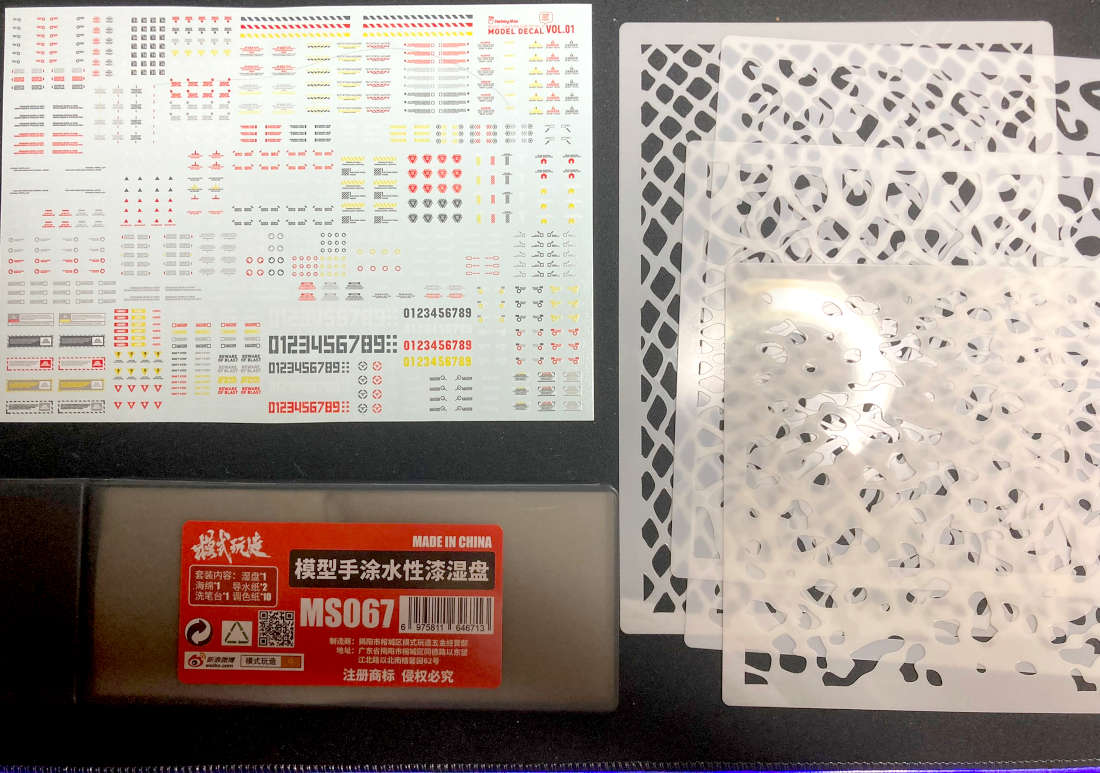
HobbyMio Sci-Fi Decals (maybe a bit of a Gundam theme here) - £1.83 - 4/5

You may have seen my recent print of Trix Robot Rider on these pages.  I'm really happy how she came out but the robot hand is crying out for some decals.  I had a look on AliExpress and was stunned by the sheer volume of waterslide decals that are available at some extremely good prices.  Most of these are replacements for specific Gundam kits but there are some which are just generic.  

I chose the HobbyMio Model Decal Vol 1 set and I'm really impressed with the diversity of symbols warning signs numbers which come in the set.  They are a mix of black, white, red and yellow with plenty of variety to sticker up your robot.  I'll update this post when I've used some to let you know how they come out and how easy they are to lay down.

12Pc Set 21x15cm Leopard Print Grafitti Stencils - £4.21 - 3/5

When I painted the wings of my Ulimate Radical Centrist B'lakor Demon, I used an old orange bag as stencil mask to get a diamond pattern.  It was okay, but very fiddly and I had seen some of the AFV modellers on YouTube using some splatter masks so thought I'd try one.  

I think I ordered the wrong thing as these are considerably larger than I expected.  With 12 different patterns to choose from these are still very useable for bigger models.  In the set are a:

  • Leopard Spots - each spot ranges from 1 to 2cm 
  • Waves - 11 different wave patterns should look good for water effects or Chris Foss inspired shampoo bottle spaceship patterns
  • Bubbles - well I don't know how to describe this stacked bubble design.
  • Large Tiger Stripes - again very useable if you are doing a tiger striped camo theme on a vehicle.
  • Voronoi - small holes measuring 1 to 1.3cm across.  Very useable for dragon hide or interior wing patterns.
  • Square Cells - an irregular collection of 4 sided holes with rounded corners.  This is going to be an absolute must for that cracked earth look.
  • Large Zebra Stripes - same as the Tiger stripes
  • Lizard Skin - a tighter mesh of diagonal holes.  Great for any large lizard (wink, wink)
  • Squished Lizard Skin - a mesh of varying sized organic shaped diamonds large on the edge to tiny in the middle.  this is going to get a lot of use I can tell.
  • Rust Splatter - that collection of irregular shapes which the AFV guys go wild for 
  • Swoopy Curves - this is less useable in my opinion and will probably see action when I just want to define a swooping curve in much the same way you might use a french curve.
  • Large Irregular Cells - again this is likely to see use in large base texture shading.

I will give them a whirl on my next 3D printed mega project which is currently staring at me with it's five fearsome heads.

Hobby MS Small Wet Pallette Set - £3.59 4/5

I've always wanted to try out a wet palette, but they are kind of intimidating and come in at around £20 or so.  I thought I'd try out one of these little travel palettes to see how I get on.

The box measures 21cm x 7cm and has two compartments, one for the palette and the other I am guessing is a water supply section.  Included are 10 sheets of "baking paper", two absorbent blotters, a thick white foam pad and a strange square metal grill.

I will have to learn how all of this goes together and how to use it as it did not come with instructions, but I did find this video on how to use it.


I'll report back with my findings...

Postage Not Included

The total I paid for all three items was only £15.83 so that was £6.20 for flat rate shipping and delivery took just shy of 8 calendar days.

Given that a pint in a london pub in 2024 is about £10 these days I think I'll try this again.  Tune in again soon for a review of some Wish.com model making goodies.


Sunday 11 February 2024

6 Essential Resin 3D Printer Accsessories

I have been resin 3D printing for almost 2 years now and here are a few of the bits of kit which I have found to be invaluable.

Essential Resin 3D Printing Accessories

Plastic Razor Blade Scrapers 

Nothing gets a blob of resin off your LCD screen better than a plastic scraper.  They don't damage the surface and they are cheaper than actual razor blades.  You can also use them to pry your prints off the build plate and they are disposable so no need to clean them.

Once you have these, you will find they have a multitude of uses around the house for all those DIY projects that they were actually designed for.

Spare FEP film

You never want your printing to be sidelined by a dodgy FEP, so having a spare film is essential for when the inevitable happens.  Changing out your FEP is just one of those skills you will need to master.  Some say that you can tune your FEP for optimal performance, but I just use the German specification gudentight.    I recommend buying from 3DJake.

3D Printer FEP Film

Fun Fact: FEP is an acronym for Fluorinated Ethylene Propylene.

Silicone Baking Tray

Resin 3D printing is a messy affair, particularly when you are extracting your prints from the build plate.  It is hard to not drip uncured resin onto your table, so I use a silicone baking sheet as a table protector.  

Nothing sticks to silicone and these mats are super easy to clean and so cheap that you can cover an entire table in the things and still have change from a tenner (£10).

PTFE Lubricant (GT85)

Every now and then you will suffer from a print that just wants to stick to the FEP rather than where it is supposed to stick, the build plate.  The best thing I have found to combat this is to give your FEP a good spray with GT85 and a gentle rub down.  This creates a microscopic PTFE layer on the surface of your FEP guaranteeing that the print will release when the build plate rises.

Everytime I change resin, change my FEP or just engage in a spot of cleaning, I give my FEP a liberal coat and then buff it dry.  GT85 will change your success rate instantly, no more failed prints, bits stuck to the FEB or layer peeling.

Plastic Funnels & Conical Paint Filters

Trying to pour your unused resin back into the bottle is a nightmare task made tolerable with the use of a funnel.  Get some conical paint filters to strain out any bits of cured resin and your life will be so much easier and less messy.

The pound store is your best bet for funnels.  You can get a bunch of filters for pennies at the usual online retailers like eBay or Amazon.  A big shout out to Jayo3D who pack 2 or 3 filters in with their 1Kg bottles of resin.

Two Wash & Cure Station Tanks 

It wasn't long into my resin 3D printing journey before my wash tank looked like a winter's morning.  This occurs when the uncured resin suspended in your IPA cures and fall to the bottom of the tank making an amorphous plastic blancmange.  Honestly, this stuff is horrendous to deal with, so having a second wash tank that you can decant into and clean your IPA is a must.  I have found that running a few curing cycles on an empty tank can work wonders. 

Thursday 1 February 2024

Jessie's Prints - Episode 33 - The Girl with the Robot Hand

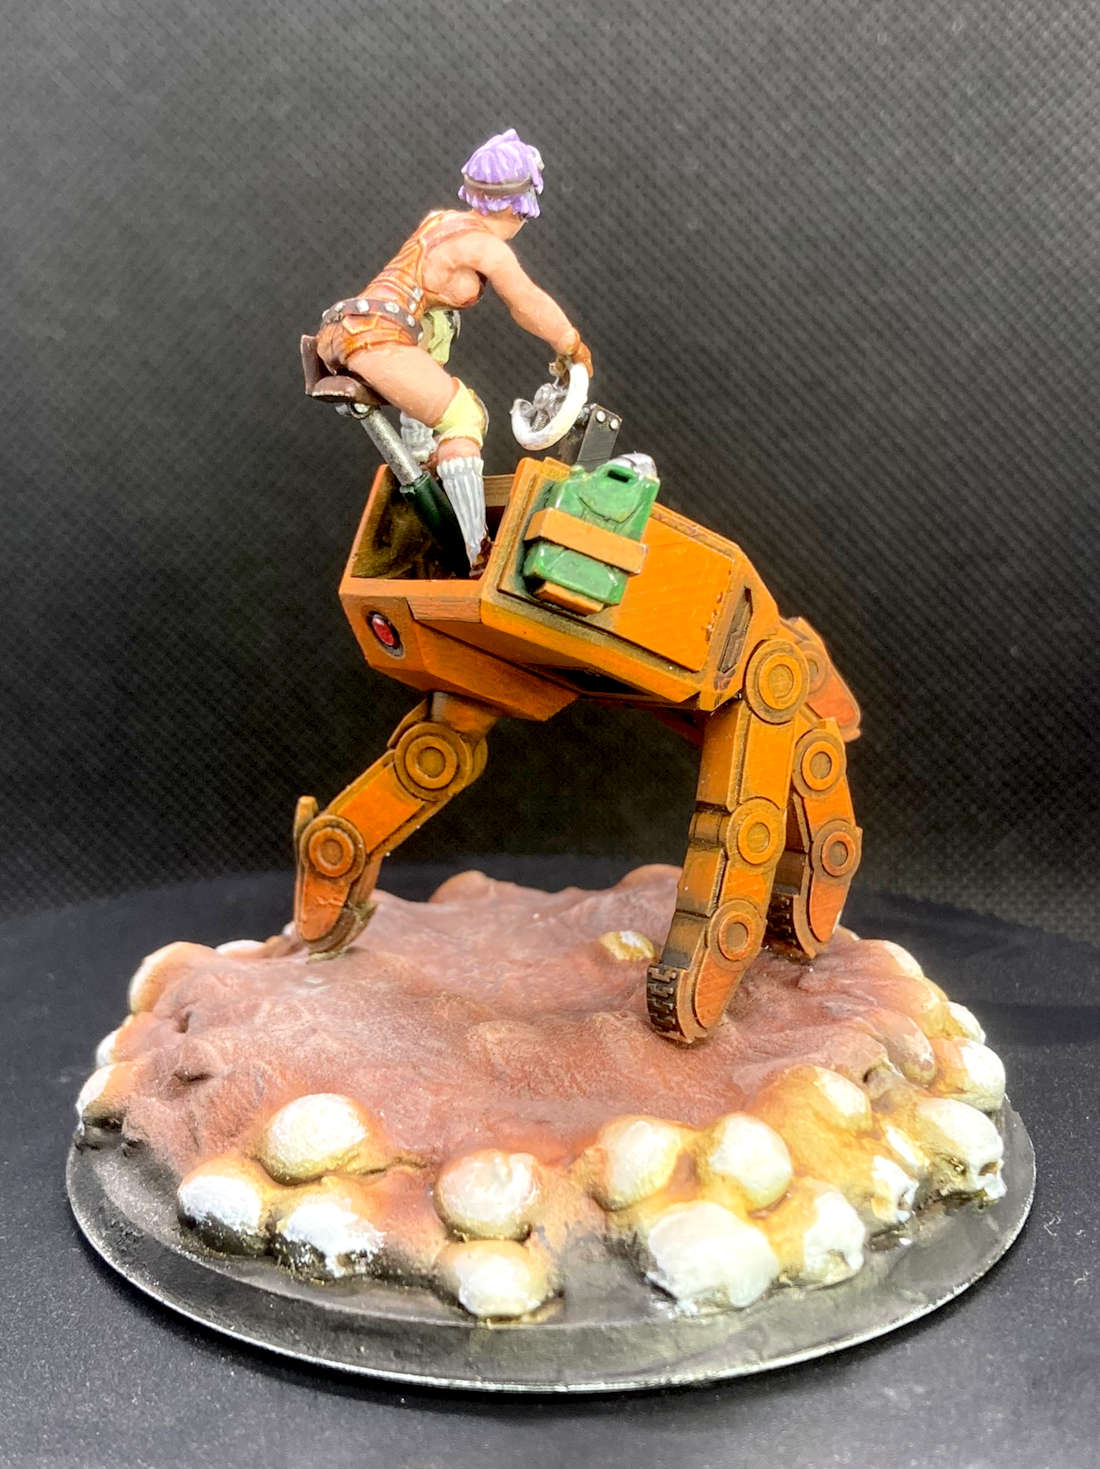
This week, I are mostly been printing... A girl riding a robot hand!!

Trix Robot Rider - Cults 3D 

I found this on EthanTSavage's Cults 3D page and thought it was an awesome sculpt.

Trix Robot Rider

The aesthetic is undeniably Anime, and for me is reminiscent of the fabulous Tank Girl comic of the 80s.  Whilst the movie ranks as one of the worst in history, I am a big fan.

Trix Robot Rider

I love Giant Robot anime, my favourite being Giant Robo: The Day the Earth Stood Still.  If you haven't watched it you should it's just the right shade of bonkers to make a strange sort of sense and is a blend of diesel punk / magical superhero anime which is incredibly rare.

Trix Robot Rider

This was a very quick model to make taking me only a few days to complete.  I used a skull base which I had originally intended for my huge demon model and slathered on the old poundland polyfilla to form a crust over the skulls. 

Trix Robot Rider

This is my homage to the famous scene in Terminator 2 where the T800s are walking across the field of human remains crushing skulls underfoot.

Saturday 3 June 2023

Judge Dredd: The Case of the Miniatures Block

Regular readers will know that my scale of choice for Judge Dredd miniatures is 15mm.

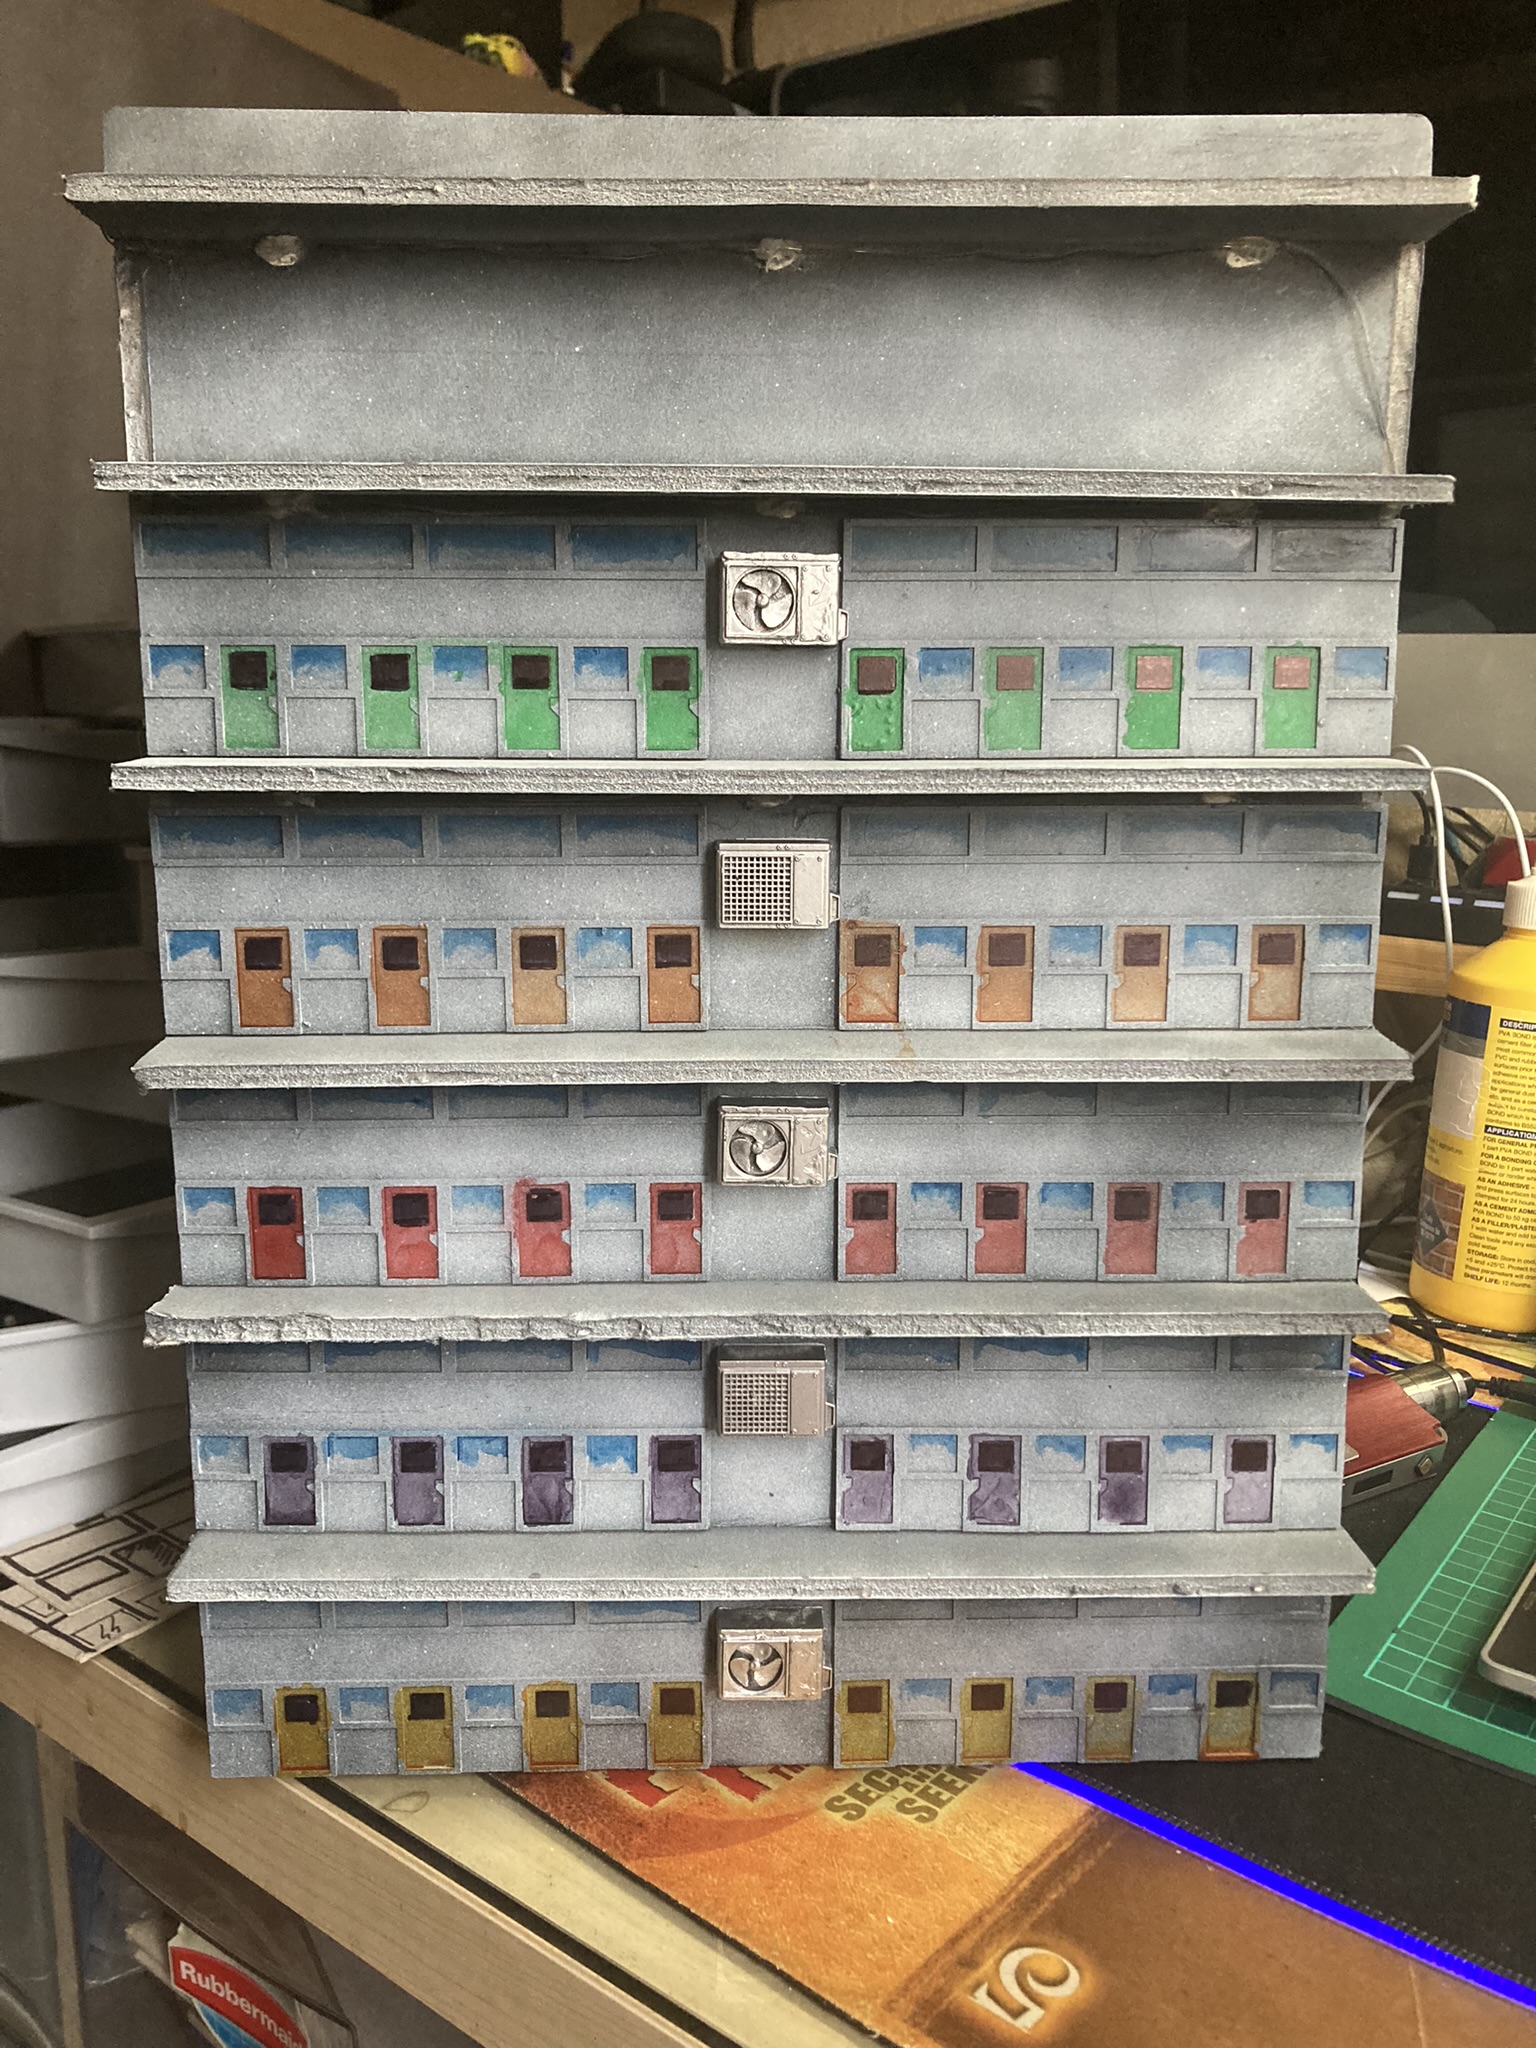
I chose this scale because it is cheap, easy to paint and the legendary Laserburn Lawmen are a perfect proxy for my favourite era of Judge Dredd, the 80s.  The problem is of course as with any tabletop game storage and transportation.  Taking a leaf out of the old Kenner Star Wars playbook I resolved to create a miniature storage case in the shape of a city block which could add some play element to my games whilst hiding away all the neat surprises I have in store for my players.

The Framework 

Fans of Aldi (a German discount retailer) will be familiar with the wonders of the middle aisle, and one such grocery shopping trip resulted in me bringing home this cheap plastic crafting drawer unit.  This was swiftly clad in sheets of foam core on three sides and a carry handle printed on my FDM printer was bolted to the top.

Judge Dred - Mega City One Miniature Storage Block Case

Balconies

I wanted to extend play in 3 dimensions so the inclusion of some elevated features was essential.  These consisted of 25mm wide strips of foam core hot glued at regular intervals up the block.  Most of my minis are based on 1p coins so this is perfect for stationing high level snipers or as a launchpad for boingers or skysurfers.

Judge Dred - Mega City One Miniature Storage Block Case - Balconies

Exterior Features

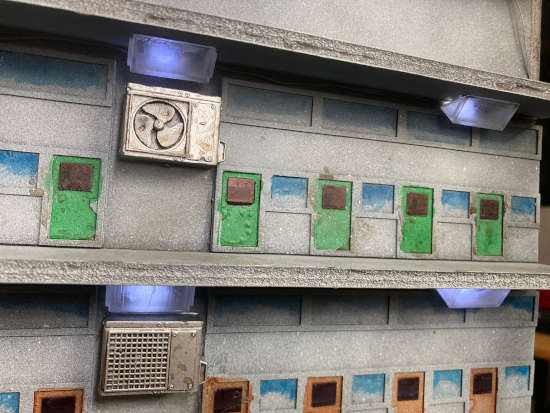
I always picture these smaller blocks as being the work of brutalist architects.  They are concrete monstrosities more akin to prisons than homes but they attempt to offer at least windows and air conditioning.  

I modelled a couple of "skins" featuring a door and windows which could be 3D printed and then attached to the foamcore facade conveniently hiding some of the wiring from the lights.  This could easily be made from mountboard, cereal packet or even thick paper if you do not have a 3D printer, but I have made the files available on thingiverse for free just download Tower Block Apartment Front Skins.

Judge Dredd Block Apartment Skins

Greeblies

No sci-fi model is complete until it is festooned with greeblies.  Some are necessary to hide wiring but all of them break up that monotonous concrete facade.  I downloaded some air con units from Thingiverse which were then printed out and positioned in the space between the apartment skins.

Judge Dredd Block Greeblies
If you are interested I have written a blog about printing some of the Judge Dredd Greeblies.

Lighting and Signage

One of the core features of any block is its plethora of crappy.  Battery powered christmas lights are perfect for this and can also perform double duty as balcony illumination.  These were strung in a zig zag pattern and then embedded in the underside of the balconies.

I then modelled some light covers to hide the tiny LEDs which added a certain amount of light diffusion aswell.

Futuristic Block Lighting Enclosures

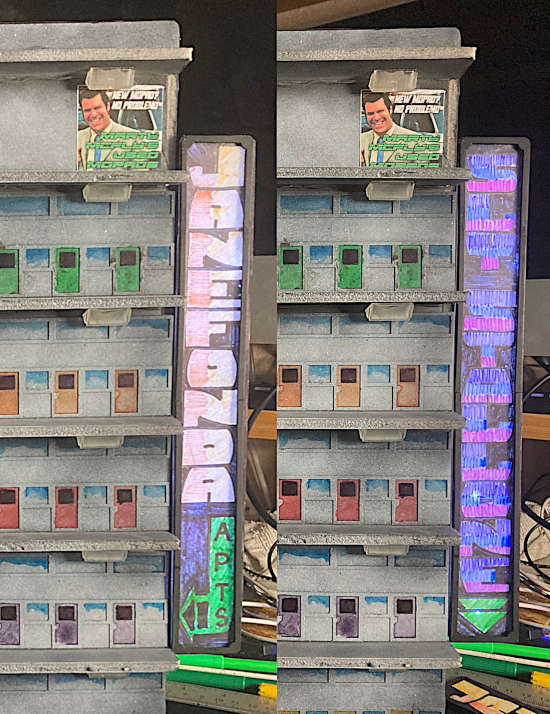
Block Name Signage

I then modelled a light box and frame to house paper block name signs for each of the blocks in my sector.  This is a versatile system which incorporates 5mm magnets and magnetic strip so you can attach the sign to either side or top of the case.  The hand drawn lettering I feel really sums up the art style of Judge Dredd during my formative years and they are super easy to knock out.  Here are just two

Block Name Signs

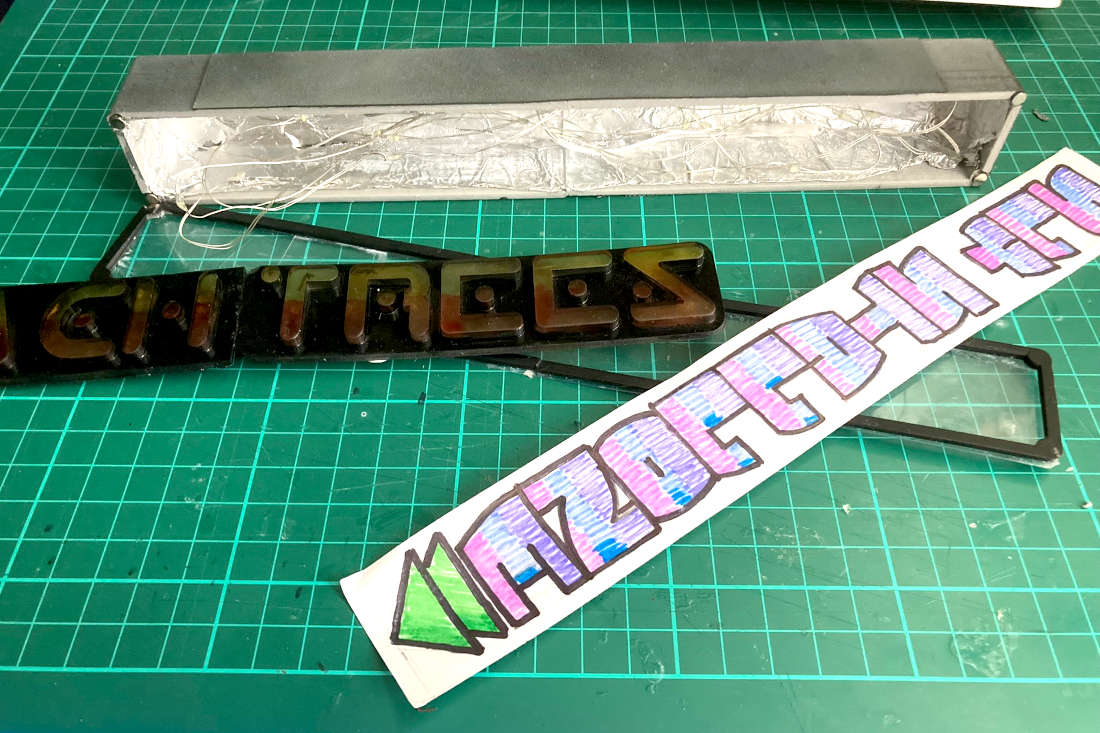
I also modelled the infamous Peach Trees Block sign which I printed in transparent resin on my Photon Mono 4K.  

The lightbox design incorporates hollow areas in the corners for the magnets to attach the frame (also magnetised).  The inside of the box is covered with aluminium foil to aid light reflection.  Signs are easily attached and detached in seconds as your scenes change. 

Block Names Light Box

The Roof

The top floor of the block would inevitably invite play so I made sure to create a 1" grid in the roof which was then further emphasized with short clippings of PLA filament to create a grid.  

Movement Grid for Roof Top Encounters

This was then painted and covered in some flock to make a rooftop garden.  The carrying handle sticks out a bit but it's form over function 

It's Magnetic Man!

Storing miniatures is the key goal, so it was crucial to make sure that they didn't move around during transport.  I stuck some A4 magnetic sheet into each tray which has enough holding power to stop my minis from skating around uncontrollably.  This is quite cheap on eBay and a good solution for smaller minis or ones which don't weigh much.

15mm Judge Dredd Miniature Magnetic Storage

For those of you using 1 pence or 2 pence pieces to base your minis, make sure that you use only pennies from 1992 onwards,  These are made of copper coated steel and are therefore magnetic.  If, like me, you were using up your penny jar and didn't know this when you based them, then you can use thin steel foil or more of the sheet you used to line your trays.

Posters and Grafitti

No block would be complete without the plethora of posters and block grafitti.  For my block This is still a work in progress which I have detailed in a seperate article - Judge Dredd: Miniature Posters for a Miniature Mega City One.

Is it Finished?

Whilst this is always going to be a work in progress, I think it is sufficiently finished to post this article with some photos.

15mm Judge Dredd Mega City One Block Storage Case - Complete

15mm Judge Dredd Block mini posters

Storage for hundreds of 15mm Judge Dredd or Sci-Fi miniatures

Video Tour

Apologies for the vertical video but this thing is pretty big.


Sunday 5 June 2022

My First Resin Mini - Sci-Fi Adventurer

As I mentioned in last week's Jessie's Prints one of my first successful prints on the new Resin 3D Printer  was the insanely detailed Sci-Fi Adventurer from Loot Studios.

Over the Jubilee Bank Holiday Weekend, I painted him.

Sci-Fi Adventurer

This is most definitely not my finest hour.  I became incredibly frustrated with this model which decided to snap at both the ankles and the ipad hand multiple times.  

I am not sure if this was an error in the printing or curing process, the brittleness of the resin or the robustness of the sculpt, but if a mini cannot stand up to the rough and tumble of painting then it does not bode well for gameplay.

There is a distinct difference between digital sculpts and hand sculpts.  Personally I prefer the chunky aesthetic of hand sculpts over the extreme detail and "spikiness" of these newfangled digital sculpts.  There is a certain charm of a vintage oldhammer mini over the new plastic kit warhammer minis never mind the scale creep that has occurred over the years.

As you can see I am still getting to grips with Army Painter Speed Paints and I ran out of white primer so the zenithal highlight was a bit muted.  The next one will be better I promise...

Saturday 4 June 2022

Boardgame Rescue - My Next Project - Warrior Knights

The next in my Rescue Mission series is going to be one of my two copies (if not both) of Games Workshop Warrior Knights circa 1985.

Warrior Knights is a great medieval wargame designed by Derek Carver who alsodesigned Blood Royale which was similarly released by Games Workshop two years later as part of their Bookcase Games range.

I have played Warrior Knights a handful of times but it always stood out as a great game with lots going on for each player both in their turn and in others as you strive to capture cities across the board, wage war and try to put your pretender on the throne.

To Pimp or Not To Pimp

That is the question.  There is limited scope for pimping the game as it comes with a huge amount of cardboard tiles for all manner of item , however, there are some options including:

Strongholds and Cities - The most notable game piece on the board are the stronghold counters which come in three flavours:

  • Stronghold - x1 - This is your barons home
  • City Control Marker - x14 - Some city walls to surround your
  • Improved Control Marker - x6 -

Noble Markers - As you can see from the photo below these generic shields just look cheap and nasty and mine have even changed colour!!

Warrior Knights - Nobles, Strongholds and Cities
Warrior Knights - Noble pawns, Stronghold and City Control Markers

Money - It makes the world go around and you end up playing with these tiny little tokens throughout the game.  Much better to have some nice plastic tokens that don't blow away if someone coughs.

Warrior Knights - Money
Warrior Knights - Money - Who has time for 1/2 crowns these days!!

Trade ships - There is an exploration element to the game represented by the 4 colonies in the corners of the board.  These work in the same way as the cities on the main board and can be captured and fought over.  Getting there requires a vote in the council and the ship's progress is represented by a small cardboard counter.  This could easily be replaced by a tiny sailing ship.  

Wish me luck

Sunday 29 May 2022

Pimp My Game - Curse of the Mummy's Tomb

Back in the midst of the Corona Curse, I went about restoring one of my favourite Games Workshop boardgames from the 1980s, Curse of the Mummy's Tomb.  

I was never truly satisfied with the result and the ultimate goal was to have a pimped out copy of this vintage classic.

A prayer to the eBay Gods and an incomplete copy of the game was soon in my hands for the princely sum of £20.  Why, you might ask, would I part with good money for an incomplete game?  Well this one had all 5 of the original minis.  

Curse of the Mummy's Tomb Minis

These are much sought after "oldhammer" minis from the Night Horrors set and bought individually carry a hefty price tag of between £15 and £20 each.  All 5 minis for the price of 1 is what I call a bargain! If only I could find my originl minis...

The Pyramid of Khonsu    

Both my original and this copy had horribly warped boards and an even worse central column.  I therefore took it upon myself to model and print a new sturdier version on my 3D printer.  I modelled this in Sketchup including all the important game elements such as the start arrows, encounter numbers, pharoahs heads, ankhs and compass, leaving the way too complicated hieroglyphic frescos to someone with better modelling skills than myself.

The Pyramid of Khonsu

The goal here was to balance printability (must fit on my print bed), functionality (must fit together and store in the original box) and playability (must have all the major functions of the original).  The middle and top floor plates all fit on the bed of my printer but the ground floor needed to be cut up into 4 segments and printed in batches.  I've seperated these out as individual models so you can play around

With a bit of trimming on the tabs it goes together easy enough.  

In order to print it on my FDM printer I split the central column into 3 pieces and magnetized each piece (16 Magnets in total) with readily available 5mm neodynium magnets. 

Curse of the Mummys Tomb Pyramid 3D Print - 1
Pyramid of Khonsu - The Floors

Curse of the Mummys Tomb Pyramid 3D Print - 2
The Floors and Columns click together

Curse of the Mummys Tomb Pyramid 3D Print - 3
Floors stacked with the help of magnets

Curse of the Mummys Tomb Pyramid 3D Print - 4
It all fits neatly back inside the original box

If you want to print your own Pyramid of Khonsu you can download the STL files for free from thingiverse

Tana Leaves

The quality of card stock in these 80s GW games would give the team at Fantasy Flight nightmares. It is so shockingly thin (10 thousands of an inch thick), I imagine you could use it to accurately set the tappets on a vintage car or level the bed of your 3D printer.  The tana leaves get a lot of handling during the game and so were another candidate for the 3D printer.  Given their size and relatively low number it was not too much of a chore to design and print 55 of the little blighters. 

Tana Leaf Tokens
Download your own replacement tokens for free from Thingiverse - Tana Leaf Tokens.

Attribute Cones

This new copy came with a few cones missing.  I could have purchased some replacements from eBay, or tried to find some replacements from boardgamemaker.com, but a pretty good alternative is available on thingiverse - Cone Game Piece (Games Workshop style)  They are the ubiquitous game tracker pawn used in many GW games of this era such as Cosmic Encounter which used them to represent the ship tokens.

Attribute Cones - Classic GW Style


The first outing for the game was as a special finale finale to my recent Judge Dredd campaign.  I'll write up the rules for this in a seperate article