Showing posts with label Accessories. Show all posts

Wednesday 10 June 2020

Father's Day Gifts for the D&D Dad

Father's Day is on Sunday 21st June 2020 which is only 10 days away but there is still time to get that special something for your D&D Dad.

Here are 9 special gift ideas you can buy on Amazon.


Under £10


A Dice Rolling Tray

Frankly I think these are an essential accessory to keep your dice rolling under control. 

I have one of these and it folds flat for easy storage and carriage.  The larger size is especially welcome when you are rolling a fistfull of those damage dice.
A New Set of Dice

It doesn't matter how many dice us D&D Dads have we can always do with some more.  I particularly like the wild colours on this set which make it look like they are on fire with magical flames.

Which is basically how I roll...
A New Notebook

Every Dungeon Dad needs a new notebook so he can fill it with campaign ideas or adventure journal entries. 

£10 to £20


A New T-Shirt


What better way for your Dad to say it loud and proud with a classy new T-Shirt. 

I particularly like the Dragon's head artwork on this one and lets face it Dragons are always found at the heart of a Dungeon which is right where this gift will get your Dad.
A New Pint Glass

What better way for your Dad to celebrate a particularly fraught campaign but to toast to fallen heroes from the skulls of their enemy.

Also a great icebreaker at BBQs.

"Could you bring me a drink in the head of Alfredo Garcia darling?"
An Area of Effect Template

This is one of the best I've seen yet.  Made of transparent acrylic with clear marked areas of effect for all the popular spells.

With this your Dad can finally end the argument of exactly who is getting hit by his fireball.

I particularly like the additional random direction feature on the outer ring because there are just those times when a spell bounces and you don't want it to come towards you.

Over £20


A Big 3 Level Pirate Ship

I was gobsmacked when I saw this.  I have been running games for over 35 years and have never found anything quite as practical as this 3 level pirate ship. 

Made from laser cut plywood this is the perfect accessory for the Dungeon Dad who likes to make his players walk the plank.  It also doubles as an impressive display stand for the man cave.

I'm just hoping that my step daughter sees this page and buys me one... fingers crossed.
Acrylic Condition Rings 72 Piece Set

If your Dad is a dungeon master he has probably encountered this problem on many an occasion.  How to track the various states that your PCs and Monsters can get themselves into during the course of a frenetic xombat.

Look no further because this set of clear acrylic condition rings puts an end to all that.  Colour coded for every one of 18 different combat conditions (4 rings of each type), these rings will help your dearest dad keep up with the upkeep of even the biggest skirmishes.
A Dice Tower

Sometimes your Dad needs all the help he can get and that means taking the human element out of rolling those pesky polyhedrons.

This is one of the tallest towers on the market and will cast an impressive shadow on everyone around the table.  It is made of cool blue transparent acrylic and is sure to mesmerise and randomise to equal effect.
Priceless

What every dad really wants is to spend some quality time with their kids.  So why not sit your dad down at the table and ask him to play a game.  He'll have memories of that special father's day forever.


Help Support this Channel

Please consider supporting this channel by clicking on the affiliate links above.  It won't cost you any more but a small percentage goes to help fund this blog.  Thank You and Happy Father's Day.

Wednesday 1 July 2015

Dungeonmorph Dice gets an Ennies Nomination

The 2015 Ennie Award Nominees are out and I don't normally get excited about these sorts of things as Gen Con is so far away and I'm unlikely to get the chance to go myself.  However, this year is different and I will be rooting for Inkwell Ideas Dungeonmorph Explorers Dice in the "Best Aid / Accessory" category.

What sets Dungeonmorph Dice apart from the other products in the category is one word... 

Community.

This nomination is more than just a reward for Joe, it's a reward for all the geomorphing contributors that have been part of our odd little cartographic community for the past 4 or 5 years. 

I know how difficult it is to come up with unique cartography and, through my involvement with the Dungeonmorphs 2 Kickstarter, how much work goes into making this idea into a real product.  The hours pouring over designs, selecting the best ones and making subtle changes here and there, not to mention the wrangling of manufacturers and shipping out orders. 


Congratulations to all the mappers out there that made this possible and lets spread the word and turn this nomination into something bigger.

Monday 27 October 2014

Citymorph Dice Kickstarter from Inkwell Ideas

Who woulda thunk it?  Citymorphs has spawned a kickstarter!!

Roll your own Cities!!
Inkwell Ideas head honcho Joe Wetzel has gathered together a few of the RPG communities morphing cartographers, myself included, and is kickstarting a version of his popular Dungeonmorph Dice but this time with city designs.

The aim is to produce a set of 5 dice with which you'll can quickly "roll up" your own city map.  There's pledge levels for all sizes of pockets with PDF/Font versions available from $5 and a set of dice for only $20.  They're pretty substantial at 1 inch square (so have dictatorial thunk of authority when they hit the table).  Unlike a lot of custom dice which might just predict the weather, random direction or what body part you've hit, these also function as regular dice and are pretty unique. 

The first set is a mix of City/Village designs,  but the project has far higher aspirations and includes stretch goals to create further sets with designs for Ruins, City Walls and Harbours.  The more money Joe can raise, the more designs he can get into production and the more variety you can create.  With plenty of stretch goals to unlock on the way like free bonus dice and dice trays available, it's a win win situation! 


Pull them out in your group and hear your friends gasp in amazement as they lust after your cool new dice, buy them for your roleplaying partner as a gift, they'll love you all the more for it.   

So if you're interested go to the Dungeonmorphs 2 kickstarter page and become a backer.


Sunday 12 August 2012

Make: iPhone Dice Tower

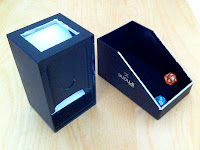
iPhone 3G box - nicely sized for use  as a dice tower or dice box
iPhone 3G box - nicely sized for use
as a dice tower or dice box
iPhone dice tower: Prepare to decouple
Prepare to decouple
iPhone dice tower: Decoupled!
Decoupled!
iPhone dice tower: ready to nest
Ready to nest
iPhone dice tower: Nested and ready for action!
Nested and ready for action!!
Okay, so it's not a dice tower made out of actual iphones, rather just the extremely sturdy boxy it came in.  I stumbled on this instructable the other day and knocked this out in a lull between olympic events last night.   

My iphone 3G got stolen a couple of years ago and I still had the box, so i decided to put the box to good use.  The 3G box is considerably larger than either the 3GS or the iphone 4 boxes (as used in the instructable) and makes a more practicle dice tower and also doubles as a capacious dice box. 

I followed the general guide in the instructable, but as I wasn't using exactly the same box, I needed to fiddle with the dimensions of the opening hole.  I also elected to just go with one baffle which throws the dice forwards onto the cradle and then down onto the 45 degree baffle at the bottom.  I think that the second baffle's job is to slow down the dice, lessening bounce-out, so I would reccommend that you stick with the instructable and put 2 baffles in if you try this yourself. 

After construction I discovered that my hand was just a bit too podgy to comfortably retrieve the dice and the visibility from an observers point of view was also quite poor.

It was a trivial matter to trim the edges of the lid at a angle to rectify this whilst maintaining its function as a lid.  I also discovered during modification that there is enough material in the off-cuts to make your baffles.  It is entirely possible to construct the dice tower solely from the contents of the iphone box with no need to resort to scraps of foam board.  Of course you will still need the glue to hold the whole thing together.


The other advantage of the using an iphone 3G box is that it comes with foam pre-glued into the lid already, which dramtically reduces the chance of dice bouncing out. 

Tuesday 11 October 2011

Old Skool Accessory: Dungeonworks Magnetic Dungeons

Before Bendy Walls... before Dwarven Forge... before Hirst Arts... there was...

Dungeonworks(TM) Magnetic Dungeon!

Released in 1991, the set consisted of a 10" square felt backed metal board with 1" square stone tiles printed on it's face.  The plastic walls and doors had a rectangular recess in the base to house a strip of magnetic plastic, a sort of thick version of that used in magnetic sign boards.

The corners of each wall section were mitred at 45 degrees so you could make convincing corners and but walls together to make corridors.  Door archways were also included in the set, but there were no doors themselves.  As you can see I added some resin cast doors to a few of the walls in my set.

There was one huge problem with the whole set which I found almost immediately during play.  The walls are way too high and the board too small.  In fact my experiences with this set were partly behind my reasons to go with a 1.5" square floorplan scale and 1" hinch walls in my foamcard 3D dungeon, a winning combination in my opinion.

The miniatures end up being crammed into a tiny area and the board can only handle a maximum room size of 50'x50'.  I guess they were expecting you to buy more than one set, but it was too heavy to carry around compared with a box of cardstock floorplans, not to mention the price.

Monday 8 August 2011

Make: 3D Dungeon Tiles Pt 3 - Painting and Decorating

As I mentioned in a Part One, I've made plenty of 2D floorplans from card and paper in the past and whenever I've painted or covered them they've warped quite considerably. So I approached the decorating of the first tile as an experiment in materials and techniques rather than trying to get any kind of quality or finish.

I was surprised to find that the foamcore stands up to painting quite well and doesn't warp much at all. I used some old rowney poster paint to begin with but this had a tendency to dry with a powdery finish so when adding wet layers on top it tended to blend or streak.

I switched to some cheap artists acrylics, but these were a bit too gritty in consistency even though they covered reasonably well and suit my painting style which is to blend up from black.

My next experiment was with household emulsion. I bought some tester pots from a local DIY store.  This made the boards warp when the paint was wet, but they flattened out a bit when they dried.

Walls & Floors

These were painted in two shades of grey, dark then a lighter grey top coat. I then drew on the mortar lines for the brick and cracked floor tiles in pencil, before giving them a black wash. The black wash was repeated in the corners and edges of the door tabs before the bricks were edgelined with a lighter grey.


Doors

Bricks and doors were drawn onto foamcore in pencil

I sketched out a few double door concepts on the computer just to give me an idea of where things like the hardware (hinges, lintels and straps) would go.


Brickwork was sketched out and then the whole door was painted in three shades of brown.


The lintel was cut out and glued onto the door, then the brickwork was painted in the same fashion as the walls and floors.  Once the highlights were done I cut out the hinges and glued them to the door.  These were painted in brown and a very dark grey.

Right First Time?

As I wrote earlier, this was as much about experimenting in materials and techniques so it would be churlish of me to give you the impression that I got it all right first time, but I wasn't a million miles away.


In this earlier attempt I decided to go for a simple black and white checkerboard design with a red inlay on the white squares to give it a bit of an accent. My lining skills are pretty poor and not helped by the scabby brushes that now remain in my paintbox after my stepdaughter has been at them, time to invest in some new ones...

The Future 

Now the basic technique has been cracked I'll be experimenting with some other features like stairs, a dias and maybe some other door concepts and different floor designs like lava and stuff...

Tuesday 2 August 2011

Make: 3D Dungeon Tiles Pt 2 - The Build

In Part One I discussed the design. However, I didn't give you any detailed plans with measurements, mostly because I didn't know how accurately I could cut the foamcore.

After a bit of trial and error, with different construction methods, I settled on the overlapping laminate design for each corner (as seen in the picture to the right).  This means that each tile has an outside measurement of 6" x 6" and they will tesselate quite nicely without any annoying gaps in the floor.  The downside to this design is that any opening which doesn't have a door or wall in it has an obvious slot in it's edge.

Cutting List

For each base you will need:

1 x Base (5mm Foamcore) - 6" x 6"

4 x Long Corner (2mm card) - 43mm x 1"
4 x Short Corner (2mm card) - 41mm x 1"
4 x Long Corner (5mm Foamcore) - 36mm x 1"
4 x Short Corner (5mm Foamcore) - 31mm x 1"
8 x Tabs (2mm card) - 10mm, 1"

Don't worry too much about getting it absolutely accurate to the mm as the foamcore is quite forgiving.  The card on the otherhand needs to be quite accurate as this is going to provide your overhang and ultimately a slot into which you can slide your door or wall sections.


All the corner sections are glued up with PVA (or Elmers) as in the picture above.  I used masking tape to bind the corner whilst I finageled in the foamcore, again the foamcore is quite forgiving so if the corners fold out, don't worry too much as the foamcore will compress back to 90 degrees when you glue each corner onto the base.


It's a good idea at this point to draw over the pencil lines on the base with a ballpoint pen, otherwise it'll be trick to get a straight edge in the confined space once you've glued on your corners.

My trial and error provided me with several abortive boards with good square corners, so I just used one as a jig.  This was invaluable and I would recommend making one.  The corners are then hot glued onto the base.  This is a bit of a messy job, but hot glue is way stronger than the foamcore's paper backing and provides a great bond.
Once all 4 corners have been glued onto the base, take some time to trim off any excess glue particularly around the join between the base and the overhanging card which forms one of the inside faces of the door/wall slot.  If there's any splodges of hotglue in the slot it will prevent your door or walls from sliding all the way to the bottom.

Then you just need to cut some 10mm x 1" tabs and hot glue to the opposite faces of the foamcore at both ends of each corner.  It took me a while to develop a technique of sliding the tabs towards the open end to get them into the correct position to prevent any hot glue seeping into the slot.

Once this is done the doors and walls can be cut from foamcore.  Doors are 3" x 2" and walls are 3" x 1", but can be trimmed down if they don't quite fit into the two slots at either side of an opening.  This gives you the option of having a door or a wall in each side.  Just cut more doors and walls as you need.

Eh Voila, three 20ft square dungeon rooms.

In my next part I'll be tackling the painting and decorating.

Monday 1 August 2011

Make: 3D Dungeon Tiles Pt 1 - The Design

One of the aspects of Roleplaying that I've always loved is the craft element, be it painting miniatures or making maps, it satisfies the modeller in me. In particular I've always wanted to have an impressive 3D dungeon setup, so when I stumbled upon Eredrian's Warhammer Quest Tiles I decided that I'd give it a go.

I've designed and built plenty of 2D tiles before, but never in 3D with walls and doors. The biggest change has been to scale everything up to a 1.5" grid as a 1" grid became too cramped and play broke down. Another inspiration was the fantastic drakkon boardgame which has a couple of fun actions like the Rotate a Room and Floating Room which I thought would be nice to have in a dungeon.


This all percolated into an embryonic design of a 6" square standard tile with a 4x4 grid 1 inch high walls with removable wall/door/feature sections which I drew out in sketchup.

In Part Two I'll be pulling out the foamcore and starting to cut.

Wednesday 25 May 2011

Dice or Cards? Choose your weapon!!

My regular gaming group (Hello Dualers!) have had the opportunity to sample my products in the early stages of development and this Friday was no different as I used them for playtesting my Decision Deck.

What's a Decision Deck? you say, well it's a pack of cards which I use instead of rolling dice.  Each card has a dice roll value corresponding to the size of dice be it a coin toss or D3 to D30.  In the production version I've added a number of other random metrics including Critical Hit, Fumble, Poker Hands and Dice Hands.  It means I don't have to look for the appropriate dice anymore or have to consult a random result chart.

I know some players object to using cards instead of dice themselves but I gotta say as a GM I really felt they worked for me.  I had my numbers ready at the turn of a card and the combat ran smoother and quicker than with dice.

What are your thoughts on the legitimacy of GMs using anything other than dice?

Tuesday 10 May 2011

Roleplay Geek Publishing - New Product - Paper Minis Set 1 - Animals

RPG is proud to announce the first in a new line of Paper Miniatures with the release of RGP004 - Paper Minis - Set 1: Animals.

Do your PCs ever forget that they're on horseback? Do you need some mundane animals to populate that village scene? Do you want ink friendly disposable miniatures?  Then this is the product for you!!

Paper Minis Set 1: Animals includes over 112 paper miniatures depicting the 28 animals featured in our sister product RGP003 Item Cards - Set 3: Animals.  Each animal is based in 4 colours, 1 for each of your PCs, plus another 6 bonus animals, that's 136 miniatures in total all for the pocket money price of $1 dollar!!.

Animals featured include; Bear, Bull, 2 Types of Camels (Bactrian and Dromedary), Carrier Pigeon, Cart Horse, Cat, Cow, Dog, Donkey, Eagle, Elephant, Goat, Horse, Lion, Llama, Mule, Musk Ox, Ostrich, Pony, Reindeer, Rhinocerous, Tiger, 2 Types of Warhorse (Light and Heavy), Water Buffalo, Wolf and Zebra plus bonus animals; Ducks, Goose, Pig, Sheep, Boar and Chicken.

Thursday 5 May 2011

Roleplay Geek Publishing - New Product - Item Cards Set 3 - Animals


Hot off the RGP press it's Item Cards Set 3 - Animals.

Does your party of PCs like to ride around the kingdom on the one warhorse that they forgot to tell you they bought in the last 2 shack village they passed through? Want some exotic transportation for that african safari you want to send them on? or do they just want to send a postcard back to mom? Well this is the product for you!!

Set 3 includes 112 cards depicting 28 animals each in 4 colours, 1 for each of your PCs. Animals featured:

Bear, Bull, 2 Types of Camels (Bactrian and Dromedary), Carrier Pigeon, Cart Horse, Cat, Cow, Dog, Donkey, Eagle, Elephant, Goat, Horse, Lion, Llama, Mule, Musk Ox, Ostrich, Pony, Reindeer, Rhinocerous, Tiger, 2 Types of Warhorse (Light and Heavy), Water Buffalo, Wolf and Zebra

As with all item cards it's at the low, low price of $1 dollar!! You can now also buy the entire set of item cards together and save 20%.

Thursday 2 December 2010

How to: make a Pringles can scroll case

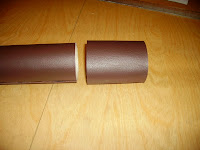
A simple cardboard tube scroll case
As I explained in an earlier post, I'm going to be running a scenario which involves the PCs having a message delivered to them in a scroll case and it needs a prop, so i'll show you how to make one.

You will need:
  • A "Pringles" can or similar stiff cardboard tube.  Ok, so I used a poster tube, but the concept's the same.
  • Faux leather or other material to cover the tube.  Cheap to buy in any haberdasher.
  • Spray-on glue, make sure to check the can to make sure it doesn't contain a solvent which will melt the vinyl.
  • A permanent marker or "Sharpie"
The Instructions:
    Mark your start point then roll - Step 1
    Cut out a rectangle - Step 1
    Mark out an end cap - Step 3
    Roll and glue end cap body - Step 4
    Mark and slash end cap body - Step 5
    Fit end cap covers - Step 6

    1. Place your material on a flat surface and place your cardboard tube on top. Use the marker to draw a line on the edge of the tube at both ends where it meets the material. Roll the tube along 1 revolution until the line on the tube meets the material and mark again. Join up the marks to make a rectangle.  Add a little extra on one long edge and one short edge. Cut section out with a sharp pair of scissors or a very sharp craft knife, be careful not to snag the backing as vinyl leather has a tendency to stretch rather than tear.

    2. Spray the glue onto the material (check the can, as you may have to leave it a few minutes to activate, make sure you do it in a well ventilated room as this stuff can be smelly if not downright hazardous if you inhale the fumes) then carefully line up the tube on one edge and roll along the material making sure that you apply even pressure to prevent any wrinkling, then leave to dry.

    3. Follow the same process you used in Step 1 to mark out another rectangle, this will become an end cap.  Mark out a glue tab and mask off with some newspaper, so when you spray on the glue you don't get any on the inside of the cap.  Optional: The vinyl is pretty thin so if you want a more sturdy cap wrap a piece of thin card around the tube a couple of times to create a sleeve.  Then mark up the rectangle around this sleeve.

    4. Place your covered tube on the unglued part of the tube and roll it up.  It's a good idea to make this part a bit loose to make it easy to get the cap on and off, leave it to dry.

    5. If your tube had a plastic cap use this to mark out two circles of material to cap off each end.  Cut these out and leave to one side.  In order to fix these to the ends of the tube and cap you'll need to cut slashes in the overhang you created.  On the long tube this is simple, on the cap you'll need to slide the cap over the end to create a decent sized flap to glue the end cap covers.

    6. Now comes the tricky bit... Spray glue on an end cap cover (you'll need to do this bit one at a time as it's fiddley) and leave for a couple of minutes to go tacky.  Then carefully attach the circular cover bending and sticking each flap as you go, leave to dry before repeating the process at the other end.  Optional: If you followed the optional instruction in step 3 you'll want to reinforce the end cap with a disc of stiff cardboard like artists mounting board.

    7. Eh Voila! you have a basic scroll case.  You can embelish it with stitching made from string, piping or brocade to cover up the seam lines.
    If you make a scroll case using these instructions please comment and include a picture link, I'd love to see how you got on.

    Next project: How to make an "antique" paper scrolls.

      Wednesday 1 December 2010

      Old Skool Accessory: The Fighting Wheel

      It sounds like some really cool martial arts weapon, or a futuristic Armoured Fighting Vehicle...

      Nope it's a circular dial which helps you calculate your favourite weapon's Damage, Space Required, #Attacks, THAC0 and AC target number.
      AD&D Fighting Wheel Game Aid #1 - Front
      Obverse (Front): Battleaxe to Footman's Pick

      How the heck do you use it? I hear you cry. 

      You find your weapon of choice around the rim (all the weapons are there, some on the front and some on the back) and then dial in your level using the inner wheel. When your level and weapon are aligned your AC bonuses appear in the middle window. Simples...
      AD&D Fighting Wheel Game Aid #1 - Back
      Reverse (Back): Horsema's Pick to Voulge and Missile Weapons

      Wednesday 17 November 2010

      Hello Whirled! ...grr... Hello World!

      Just had my case for membership of the rpgbloggers.com network approved, so woot! is me.  Sadly the first of my posts which was visible was an abortive mobile blogging attempt via BlogWritter app on my 3GS.  Damn unintuitive GUI!! I've just worked out that if you're in the "New Post" screen you can save a post in draft format just by tapping "Back".  Lesson learned...

      "What was your first post then!" you ask

      It was an instructable on how to make a scroll case from a Pringles can.

      Let me explain, I'm looking through my old copies of Dungeon to get a few scenarios to link together to form a new plotline for my campaign world The Lands of Dual and I came across the scenario "A Race Against Time" (Issue 81 Jul/Aug 2000).  The scenario features a nice 3 hour timed plotline which calls for the delivery of a message in a scroll case delivered via juvenile winged snake courier.  The message is the cornerstone of the scenario and will be poured over ad-infitum by the players, so I thought it would be nice to give them a nice handout to look at.  The theatrics are very important for the message's punchline so I need to make a scroll case to hold the message.  The campaign starts in Jan 2011 so watch-out for more posts about the make and a session report.

      Tuesday 9 November 2010

      Trouble with Torchlight - Part 1: Ideas

      A session of a recent Diamond Throne game I played involved a short dungeon crawl.  The age old problem of lighting for the non infravision equipped players reared it's ugly head.  This got me thinking about ways to show the limit of torchlight in different ways, without turning this into a massive maker project.  I thought I'd brainstorm the options and jot them down here and then produce a few prototypes and document how each one works in a game.

      2D Templates

      The simplest (and perhaps most obvious) of options to make is a flat template:

      Pros & Cons:
      • flat and therefore easy to transport in a flap or a pocket in a ringbinder.
      • easy to make, print on OHP (Over-Head Projector) film and cut out.
      • cheap.
      • can't simulate the height of anything
      Idea 1: Single Zone - this template is the simplest to make, just use a compass to scribe a circle of the appropriate diameter on a sheet of stiff transparent plastic.  A good source for the plastic is packaging windows, you know the ones, the boxes from those toys you bought for Christmas with the big plastic windows so you can see what you're buying yourself.  There's no need to print anything on, but if you make lots of different ones for different effects you might need to write effect names on them with Permanent Marker. 

      Idea 2: Multiple Zones - Slightly harder to make, and you might need to design something on the computer and then print it out onto OHP film.  Another way is to stack them on top of one another, pin or fix together with glue to show different effect zones.  If you can't get hold of coloured transparency film then colour with careful use of permanent marker.  The zones don't even have to be for the same game, the possibilities are up to you.
      A 2D Multi Zone template

      3D Templates

      Same as 2D but with the added dimension of ... height. 

      Pros & Cons:
      • They're 3D so probably won't fold and therefore difficult to transport
      • Harder to make or find suitable component
      • More expensive
      • Bulkier in play, do they interfere with other miniatures, move them
      Idea 1: The Dome or Tub - Finding suitable components for this will be tricky but I should have at least 1 by the time I write Part 3.  Some options are plastic soft drink bottles, CD drums, caps from Frappucchino or smoothie cups.

      Idea 2: The Ring - a simple ring of stiff transparent plastic which stands on it's rim.   This I will definitely try to make.  A more advanced design would be adjustable like a belt so you can expand the ring for different sized zones.  The width of the ring can be made to simulate the height of an effect.  I'll make the belt style and try it out.

      A Ring
      Idea 3: The Cone - A cone of transparent plastic which can be placed over a miniature.  Cones stack inside each other for transport.  They can also be made out of a flat sheet of stiff transparent plastic like OHP film.

      A Cone
      Idea 4: The Cube - a transparent box which can be be created from flat sheets of stiff transparent plastic.  Sounds like papercraft to me, let me at it.

      The Weird & Bizarre

      A combination of 2D templates with a stand or something totally different.

      Pros & Cons:
      • clumsy to use in play
      • expensive
      • hard to make
      • hard to store
      Idea1: Tripod & Torch - Use a length of stiff wire or a wire coathanger and a pare of wire cutters to make a rudimetary tripod and a ring over which you can hang a small torch.  If the torch has a beam focus you could use it to give different size effect areas.

      Idea 2: Tack and String - Less of a template and more of a measuring device.  Push a pin into the base of a plastic miniature then knot lengths of string to the pin.  Trim the string to the appropriate length or if making a multipurpose string add coloured tabs to the string.  Each miniature then has a handy radius measure

      Idea 3: Radius rod.  Using a thin brass rod, dowel or heavy gauge wire.  Thread a 2D template onto the rod through a hole in it's centre.  A step or a blob of glue can be used to stop the template falling off the rod during use.  Templates can be removed for storage.  I'll have a go at this one.

      If you've got some ideas that you want me to explore in prototype, feel free to comment below and if they pique my creativity I might just make them.  If you've got any prototype pics you've made yourself feel free to add links.

      Sunday 3 October 2010

      Old School Accessories: Story Path Cards

      This is the first in a series of posts where I dig out all my old school accessories, game aids etc and try to explain how they work in a game session.

      STORY PATH CARDS

      Designed by Mark Rein Hagen and originally published by Lion Rampant as "Whimsy Cards" before being republished as "Story Path Cards" by White Wolf in 1990. There were 2 decks available: "The Path of Horror" and "The Path of Intrigue", both containing 24 tarot sized cards.

      The cards feature a number from 1 to 7 and are played by either players or DM, in sequence starting with #1, a "Theme Card" which sets the overall tone, then 2, 3 and so on until a "Climax Card" is played. Playing cards allows players to influence the direction of the storyline or to gain extra insight into NPC motivations or find out rumours. Players are given cards by the DM either as rewards for good roleplay or heroic actions and can be played at any time, the DM being the final judge of the ultimate effect of any card. The DM can also use the cards to randomly generate an adventure or story path.

      Big thanks to +Reuben Beattie and  +Regis Bacquet for providing the text for the missing cards.


      THE PATH OF HORROR
      SERPATH #CARD TITLE CARD TEXT
      1 1 Hint of Madness Theme Card: The hideous wails of a thousand sorrows rise from the pit, slowly growing into a crescendo of madness.  This Path explores that aspect of reality, or lack of it, which deals with life on the edge.
      2 1 Lost Cause Theme Card:All efforts and ambitions are doomed to failure and defeat.  Ultimately, everything that the characters attempt will fail - they are on a lost cause.  There may be a way out, but only after this streak of misfortune plays itself out
      3 1Sense of Foreboding Theme Card: The apprehension of danger foreshadows great peril.  Something in the air portends calamity, misfortune and death.  What is going to happen to you, or rather - when is it?  The horror of anticipation should permeate this Path
      4 1Vast Unknown Theme Card:The universe is broad and contains much within it that is unknown, and ultimately, unknowable.  Mysteries, secrets, hidden terrors, dark horrors, and all that lurks beyond our sight can be a part of this Path
      5 2Eerie Sounds Describe a strange, nearly unidentifiable sound resounding from the depths of the night - cackling laughter, God-foresaken howling, whispering voices, or a cry in the dark.  "What was that!  Did you hear something?"
      6 2Sickly Stench Describe a horrible, nauseating smell of unidentifiable origin.  The smell might be of import to someone, a clue to what they are searching for.  "Its stench is like a cross between burning rubber and milk that's been left out for a month."
      7 2Unnatural Silence Where there was once sound, noise, life, now there is only stark brutal silence.  Inexplicable and sudden, the absence of noise makes the heart grow cold.  The clutch of fear grasps all with this somehow sinister change in events.
      8 2Unnerving Premonitions Describe to a single character a dark but uncertain vision of what may await them if they persevere in what they are doing.  Make it as sinister, malignant and apocalyptic as you desire - perhaps it really is only a vision.
      9 3Fleeting Glimpse Through the trees, out od the darkness or from the shadows, the characters catch sight of something horrible or strange that fills their hearts with terror.  Describe in detail what they see, but who or what it really is might not be known for some time.
      10 3Ominous Omen Introduce an enigmatic omen of peril into the story - a black cat crosses the rod or the characters discouver the moldering corpses of a previous expedition.  Something suggests future evil, but the significance of an omen is always uncertain.
      11 3Strange Apparition Describe the appearance of a phantom, haunt, spectre, marsh-fire, will-o-wisp or even a delusion.  Something that is conjured out of the fog or supposedly seen in the shadows.  Whether real or hallucination will be discovered soon enough.
      12 3Suspicious Stranger Introduce a stranger to the story - a cloaked wanderer, a sly guttersnipe, or a brutal bounty hunter.  Someone of a sinister nature that suggests, rightly or wrongly, of future peril - an outsider in your midst.
      13 3Remembered Dream A relevant dream is recalled by a character. Describe the specifics of a nightmare, daydream or vision in an evocative and compelling manner, in a way that relates to the character's personality. What the character makes of it, however, is up to him. (Missing Card Text Supplied by: Regis Bacquet)
      14 4Hapless Victim An innocent is harmed, sacrificed, or oppressed.  Perhaps they are hoodwinked, duped, tortured, or brutalized.  Describe the appearances of the situation, but leave the specifics to the GM.
      15 4Open AssaultClimax Card: The anticipation is over and the horror finally emerges in its full splendor - there is no need of dread, for terror will do.  Describe an attack of some sort upon a character or characters by an agent of the horror.
      16 4Something's Missing Describe the loss of an object, person or animal which might have been important to a character, and explain why it might be missing (it had better make sense).  Whether it's really gone or not, or if the character is just imagining things, is up to the GM.
      17 4Unknown Lurker Describe to a character the sensation that someone or something is lurking near them, just outside the periphery of their vision.  Identify how evidence of this fiendish prowler was obtained: tracks, sounds or maybe a confrontation.
      18 5Horrifying Discovery Discoveries are not always heroic, they are often horrific.  Describe a discovery by a character in a way that will appall and frighten the players.  The close presence of such perversity is startling even to the most jaded.
      19 5Sudden Panic Describe the frenzied emergence of dread and horror in a character or characters, or its residual effects.  It could  be just a false alarm, or they might have seen, heard or sensed something.
      20 5Unforseen Calamity Climax Card: Because of what was overlooked and misunderstood, a great tragedy occurs, and something of consequence to the characters involved.  What appears to happen is up to you - what actually occurs is up to the GM.
      21 6 Abduction Climax Card: Someone or something is taken away, kidnapped or stolen - or an attempt is made to do so (perhaps just the results of such could be discovered).  Describe what is seen, but leave the results to the GM
      22 6 Disfigurement Something or someone has been marred or had their aesthetic value reduced, creating something of unpleasant and perhaps horrific countenance.  Describe what is seen in as much gruesome detail as you can.
      23 6 Misguided Hope It is hope that leads us onward into the future, and sometimes it is only hope that that keeps us going.  But sometimes hope proves to be misguided.  How was the hope misguided and what is likely to result because of it?
      24 7 New Found Escape Climax Card: Describe a potential way out of the situation, an escape which will take a character or characters out of harm's way.  It must make sense and fit the story, otherwise it's going to be Vetoed out from under you.


      THE PATH OF INTRIGUE
      SER PATH # CARD TITLE CARD TEXT
      1 1 Animosity Theme Card: Hostility is prevalent and open, and hate affects everything in this Path, tainting and corrupting even the player characters.  This ill will may be openly expressed or harboured secretly in the heart, waiting to reupt at a later time.
      2 1 Betrayal Theme Card: All is deception and treachery.  You can trust nothing and no one.  This Path explores the double-crosses, faithlessness, and betrayals of a story of intrigue.  All cards played in this Path should relate to this theme of betrayal.
      3 1 Things are Not as They Seem Theme Card:What seems to be one thing is actually another.  What was once certain is now unknown.  This Path explores the confusion and mutability of what is thought to be known - the reality behind the veil of "truth."
      4 1 Vengence Theme Card: The sweet fulfillment of righteous revenge is a driving force.  It directs, mutates and consumes all that it touches.  The effects of someone's avenging nature must touch every card that is played along this Path.
      5 2 Lasting Impression An impression is made or an old one is reborn.  Perhaps the emotional effects of a forgotten experience reawakens within the character's mind, which may be of some import to the current situation.  Perhaps something occurs which will never be forgotten.
      6 2 Meaningful Glance The observation of a meaningful glance between two characters might illuminate the mysteries and secrets of the intrigues that are involved.  What really is seen and what it signifies are determined by the GM.
      7 2 Mysterious Stranger Introduce the appearance of a new and strange character into the story.  This individual forbodes an uncertain and mysterious future.  This card also allows you to describe in more detail anyone the GM has mentioned in passing.
      8 2 Overheard Conversation Relate to a character or characters a conversation overheard, making sure to describe how they happen to be within hearing distance.  You should only describe the situation and let the GM relate the details of the conversation.
      9 2 Taint of Corruption The stench is everywhere and unavoidable, whether it be political, social or animal.  It corrupts everything it touches, and always leaves its residue behind.  Describe what type of corruption it is and what type of mark it leaves behind.
      10 3 Convincing Argument A character is convinced, either enthusiastically or reluctantly, of the validity of another point of view.  They are swayed by the words and logic of another's argument.  Whether they are pretending, confused, or truly convinced is up to the GM.
      11 3 Hidden Weapon Describe how a weapon of some sort is being carried secretly by a character, giving another character a chance to spot it.  This could be a physical tool of destruction, or something less substantial, more subtle, nd far more dangerous.
      12 3 Veiled Threat A threat is made, though not in direct terms, for a degree of subtly is employed.  While the magnitude of the threat may not be fully understood and the characters are unsure of what was said, the overall meaning is quite clear, "… or else."
      13 3 Ulterior Motive Describe the covert intentions of a character, motives that a character may have besides those already known. This ulterior motive may have been discovered by a character, or it could be something shared by the players (at least at first). (Missing Card Text Supplied by: Reuben Beattie)
      14 4 Double Cross Climax Card: After a deal or understanding has been reached, a betrayal is made which could drive a character into ruin.  Describe the moment when the character first realizes something is amiss, but leave the details up to the GM.
      15 4 Malicious Intent A character does not mean well for those who oppose him, and concocts an evil plan.  The full nature of the enemy's design and what may later befall his enemies is likely to be unknown.
      16 4 Secret Message A message or a letter was either seen being passed along, or was somehow intercepted.  Describe the details behind the observation or the interception.  The GM will determine the contents of the message, if it can be understood at all.
      17 4 False Accusations An attempt is made to bring suspicion upon a character, through gossip, innuendo, or open accusation. Describe the details behind the accusation, but if it will substantially alter the plot, you'd better speak with the GM first. (Missing Card Text Supplied by: Reuben Beattie)
      18 5 Impasse A deadlock is reached from which there seems to be no escape.  Opinions and positions are entrenched and no one's giving an inch.  It does not seem as if the dispute can be amicably settled and a more extreme stage of conflict might soon be reached.
      19 5 Mistaken Identity Someone or something is taken for something else.  Embarrassment and even injury may result because of it.  Describe how the blunder was made, and the GM will decide how it will be concluded.
      20 5 Uncovered Weakness Climax Card: A situation may reverse itself as a weakness in the opponents' defenses is uncovered.  Secrets are revealed, new information surfaces, or the missing scale on a dragon is spotted.  Victory may soon be possible.
      21 6 Inopportune Arrival They arrived just in time - just in time, that is, to screw things up.  Something or someone just arrived to the chagrin or disadvantage of someone.  Unwelcome relatives, hated rivals, or perhaps the police.
      22 6 Startling Discovery Climax Card: What has been found is a surprise to all, giving great insight into what is being investigated or pursued.  Though not all may be made clear, much is revealed by the discovery (as described by GM).
      23 6 Unwelcome Visitor Someone or something appears in the scene that does not belong, yet is not necessarily an enemy or a danger.  They may complicate matters with their presence, but could actually be of some value later on.
      24 7 Unexplained Aid Climax Card: The cavalry comes to the rescue, bringing unanticipated help.  The rescue, however, may not be without its price.  Describe the aid as it is first perceived but leave the details to the GM.