Showing posts with label 3D Printing. Show all posts

Monday 18 March 2024

Jessie's Prints - Episode 39 - Index Card RPG Card Back Stamps

This week, I are mostly been printing... Stamps!!

INDEX CARD RPG CARD BACK STAMPS - Thing 6538692

My recent foray into the Index Card RPG system (ICRPG) involved a lot of DIY card making, which I love.

However, during play this presented a problem in that all my card backs where blank and indistinguishable from each other.  What I needed was a simple stamp which I could apply to my card backs.  

I find it useful to categorise my cards into one of 4 types:

  • People - NPCs, Villains, Bio-forms
  • Places - Locations, buildings, Landscapes 
  • Objects - Things, weapons, loot, traps and trinkets
  • Monsters - Stuff that wants to kill you

This would help me to keep my ICRPG cards organized and reduce seek times to a minimum and thereby make me look like a great DM.

Tinker Cad to the Rescue

My experiments making a plaque for my Cowboy Bebop Swordfish II model taught me that this was going to be easily achieved.  

Step 1 - Make a black and white image in GIMP where black is what you want stamped and white is what you don't want to stamp.  This image is then reversed and saved as a JPG or PNG.

ICRPG Card Back Stamp - Places

Step 2 - Use convertio.co to convert your JPG or PNG into an SVG which can then be imported into Tinkercad.

ICRPG Card Back Stamps - Tinkercad

Step 3 - Import your SVG into Tinkercad and scale it to fit inside your stamp pad.  Make sure that the stamp is at least 4mm high and that you create a backing plate at least 1mm high to connect all the pieces of your stamp together.  Position the stamp so that it intersects with the backing plate and then group the objects together.  Export this as an STL for your 3D printer.  

ICRPG Card Back Stamps - Ready to Slice

Step 4 - Make a wooden backing plate and handle for each of your stamps.  If you get into ICRPG you are going to be making a lot of cards and doing a lot of stamping so this step is essential for long lasting stamps.  I made mine out of some scraps of hardboard I had laying around and I glued some pieces of old broom handle onto the backing plates before supergluing my stamps together.  

You could of course model the whole thing in Tinkercad.
 
ICRPG Stamps - DIY Handles

Step 5
- Stamp Away!! - I bought some cheap stamp pads from AliExpress less than £1.50 each and they have lots of different colours to choose from so you can have a different colour for each card type.

 
ICRPG Card Back Stamps

Buy Me a Coffee

I have shared the stamp patterns on Thingiverse, so if you like them, download them and print your own card backs.  Support the channel and please leave a tip in the jar or use the paypal tip link.   

Saturday 16 March 2024

1:30 Scale Nax Fishing Vessel - NTKJ MODEL - Part One

In my recent foray into buying modelling supplies from Wish.com I mentioned that I had ordered a little wooden boat kit but that the order got cancelled.

Needless to say, I found a different seller on AliExpress and snapped it up.

This is a fun little kit and my first foray into making a wooden boat with a planked hull.  I made a balsa wood sailing yacht from old model engineering plans, decades ago with a lot of help from my dad, but I can't remember if we ever finished it.

The NAX Fishing Boat or should I say NAXOS Fishing Boat

The inspiration for this model is clearly that of a mediterranean coastal fishing vessel of which there are many models.  The kit is made by NTKJ Model and sold through various etailers.

Naxos fishing boat models

This is plenty of inspiration for me to commence making this kit.

Meet the Parts

The kit comes as a set of 6 laser cut wooden sheets, a couple of dowels for the mast and a reel of cotton for the rigging.  A set of pictorial instructions with quite well translated text completes the package which cost the grand sum of £5.94 which in 2024 money is less than a Big Mac meal.  

1:30 Scale Nax Fishing Boat - The Parts

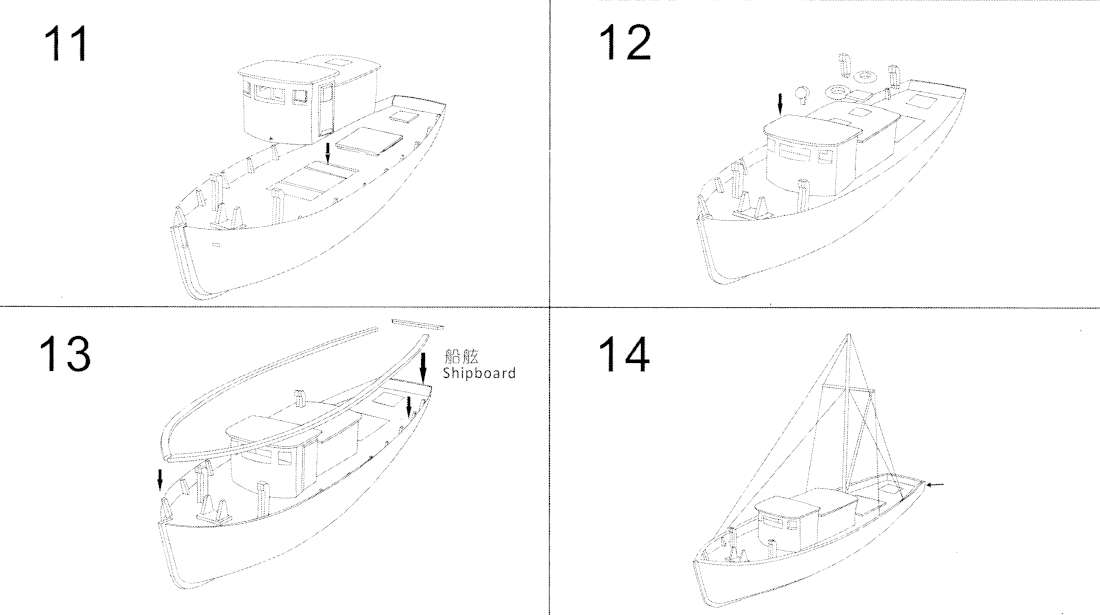
Steps 1-4 - Making the Deckhouse

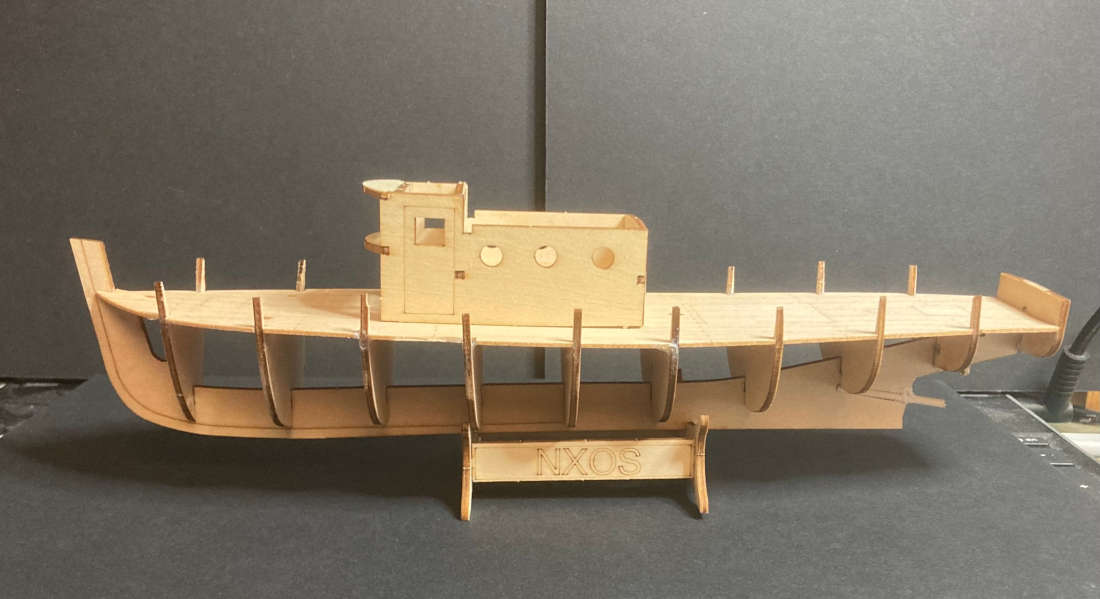
Whilst the first 4 parts seem fairly self explanatory and involve removing the deckhouse parts and assembling them, the parts are not numbered.  There is a disparity in the plans, in particular the inner bulkhead seems to have a large notch behind it which intimates a part fits into it but the instructions offer no assistance as to what goes in here.   

NAX Fishing Boat Kit Steps 1-4

The wheelhouse fits to the deck with 6 pegs and matching holes.  Dry fitting the parts to the deck helps keep the wheel house square and stable whilst gluing the instrument panel back wall and the top visor.

I left the roof unglued to enable me to paint the inside and out and to glaze the windows and doors with acetate.  

NAX Fishing Boat - Wheelhouse - Steps 1-4

This model is ripe for replacing some of the clumsier laser cut parts with 3D printed ones.  In particular the boat has some cowl vents which are made of laminated wood but they look awful and it will be so much easier to find some on the web or even scratch build.  The same can be said for the portholes and life preservers.  

  • Cowl Vents - Cults 3D - A collection of vents of different shapes and sizes.  The two large vents at the front of the boat are 20mm tall and the one on the rear of the wheelhouse is 10.3mm tall. 

  • Life Preservers - Thingiverse - A good looking life preserver model.  You will need to print six, two at 10.5mm across and four at 12.5mm across.

  • Boat Anchor - Printables - This anchor seems to have the same shape and dimensions as the wooden one.  However, the model is huge and will need to be scaled down to fit.

  • 3 Bladed Screw - Thingiverse - This will need to print this on a resin printer at about XX scale  The original prop is about 11.5mm in diameter.

Steps 5-8 - Laying down the keel 

Now the serious work begins.  The frames are all numbered and from 1 to 10 and are slotted into their corresponding slots in the keel.  Be careful when removing theframes from the sheet as the protruding sections are prone to breaking due to the orientation of the wood grain.

NAX Fishing Boat Plans - Steps 5-8

The diagonal slot at the stern of the boat I thought might be for the stern tube but there was no mention of it on the plans.  The kit comes with two diameters of dowel.  The thin one should be for the stern tube and it is a good idea to add a 1¼ inch length at this point as the keel is relatively thin and likely to snap as you insert the frame 8.  Ask me how I know...   

You could add the rudder at this point but the stupid thing has one mission in life and that is to snap.  It is much better to leave this until after you have planked the hull and either fit it or replace it with a 3D printed part.

Once all the frames are fitted you can add the deck plate.  Before you do STOP! 

Take the time now to add some cardstock or a thin piece of styrene to the back of the deck plate.  It is incredibly thin and the laser engraved planking makes some of the edge planks prone to detatching.  The slots that the frames fit in are also too thin and not in exactly the right places for the frames to slot into so you are going to have a whale of a time gently coaxing them into place and you will probably snap a few.  Don't panic.  Take some time out to put the stand together and have a cup of tea.  

NAX Fishing Boat - Steps 5-6

The next step is the one I've been both dreading and looking forward to in equal measure.

Steps 7-8 Planking the Hull

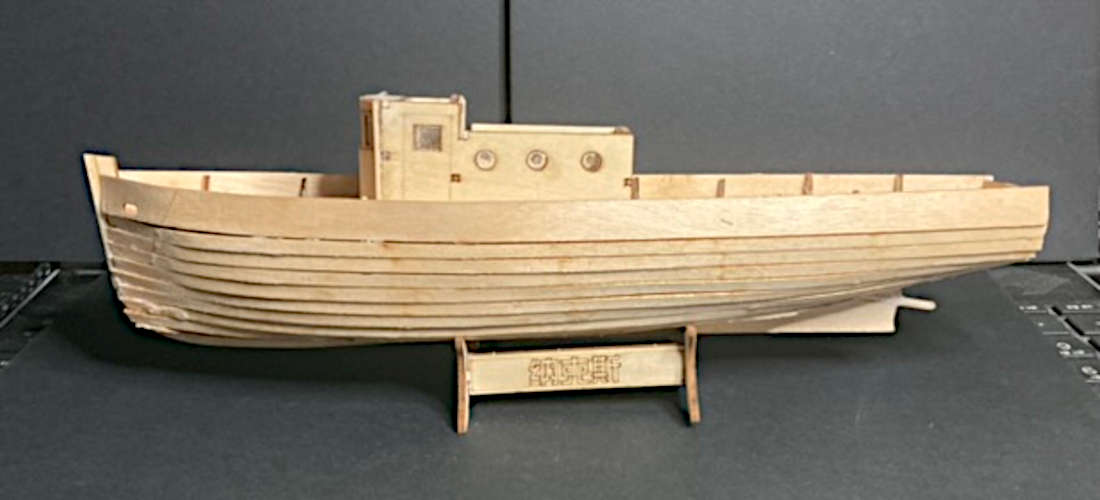
That kettle you just boiled is going to be handy.  We now need to steam the first couple of planks.  These are the wide ones with the little oval holes on the planking sheets marked IV.  The holes go at the bow (the front) of the boat and you will need to hold the end of the plank in the hot steam to soften it and then gently put a curve into it. 

This is incredibly fiddly so be patient.  With these straight planks being made of plywood they really aren't made to go around these curves.  I glued 8 planks down from the sheerstrake (the wide one) and then the remaining planks up from the bottom.  These all had to be shaped at both ends to fit.

Nax Fishing Boat - Steps 7 to 8

There will be lots of gaps.  When we shape the hull planks by sanding we are going to use some wood filler to fill in the gaps.  Real wooden boats have caulked seams and they are designed to swell when they get wet and thereby get tighter.  The hull is going to be painted so you won't be able to see the seams.

More 3D Printed Accessories

Fisherman with ships Wheel - Thingiverse - I spent a long time trying to find a suitable helmsman for my boat and this one conjurs up the same vibe as the Lovecraftian fishing horror game Dredge. be

To be continued...

Monday 11 March 2024

Jessie's Prints - Episode 38 - Warduke

This week, I are mostly been printing... Warduke

Back to regular scale printing this week with a character from the early days of D&D and a firm favourite with all the fantasy damsels.

Warduke - Cults 3D

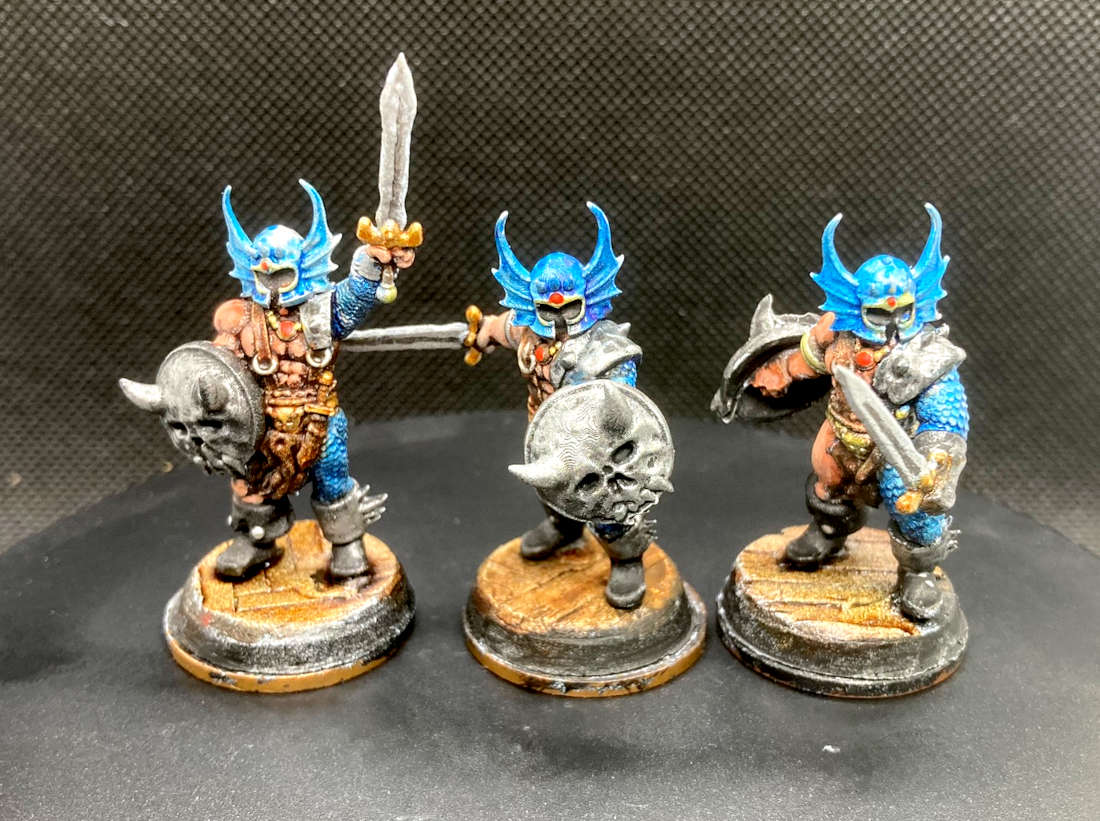
Warduke is an iconic fighter and in this printable version we have him as seen across three stages of his metamorphosis from journeyman fighter to outright blasphemous bad guy.  This totally reminds me of the Ral Partha 3 Level character minis for AD&D from back in the day.  Last time I painted up a set of these it was the Illusionist and I think they came out really cool.

Warduke - 3 Stages of character development

The Origins of Warduke

According to Dux Bellorum the first appearance of Warduke was on the cover of Dragon Magazine #17 (1978) before becoming the main protagonist in the LJN D&D action figure toy line. He is fully fleshed out in the XL-1 Quest for the Heartstone adventure module for Dungeons & Dragons BECMI.

Growing up in the UK in the 80s we never really had the LJN toys and I only occasionally managed to snag a copy of dungeon magazine as "official D&D" source material was fairly thin on the ground.  

We had White Dwarf instead, which back when the hobby was in its infancy and Games Workshop sold other games, they would support those games with scenarios and new monsters.  They did this for all the games they sold including Runequest, Call of Cthulhu, Paranoia, Car Wars to name just a few.  

They didn't stop this practice until September 1987 (WD Issue 93) when they printed the last AD&D Scenario "Getting Away With Most of It"  by James Wallis.  This issue was the one where they previewed the classic art from the Rogue Trader cover and explained what Warhammer 40K was. 

Painting Warduke

The coolest part of Warduke is of course his metallic blue armour and winged helmet.  This is an undeniable throwback to his 70s disco roots.  Back in the day, anything remotely sci-fi got painted in Humbrol (222) Moonlight Blue metallic paint.  In fact everything in the 70s was a coloured metallic.  The first car I ever owned, a 1975 4-door Mk2 Escort, came in a fantastic shade called Purple Velvet Metallic. 

Recreating that shade was easy with a silver base and a coat of Army Painter's appropriately named Highlord Blue Speed Paint.  His armour is deceptively weird being a mix of chain over bare skin and what look like an animal fur or leather loin cloth.

Warduke - 3 Character Levels


Equally bizarre are his boots, with one boot cuff in silver for some unknown reason and the other all black with two big silver studs.  You cannot deny he has a pretty awesome skull shield which just gets the dry brush treatment along with his trusty and utilitarian sword.  

A golden codpiece / underpants combo in the shape of some monstrous demonic visage and two red gems finish him off. 

Monday 4 March 2024

Jessie's Prints - Episode 37 - Epic Space Knights or Holocaust Squad Judges?

This week, I are mostly been printing... Teeny Tiny Space Knights!!

After last episode's commissioned print I wondered just how small can my 3D Printer print?  In particular I'm after some power armoured troopers to fill in as Holocaust Squad Judges.

Ball Bearing Galactic Crusaders with Chain Axes - Cults 3D

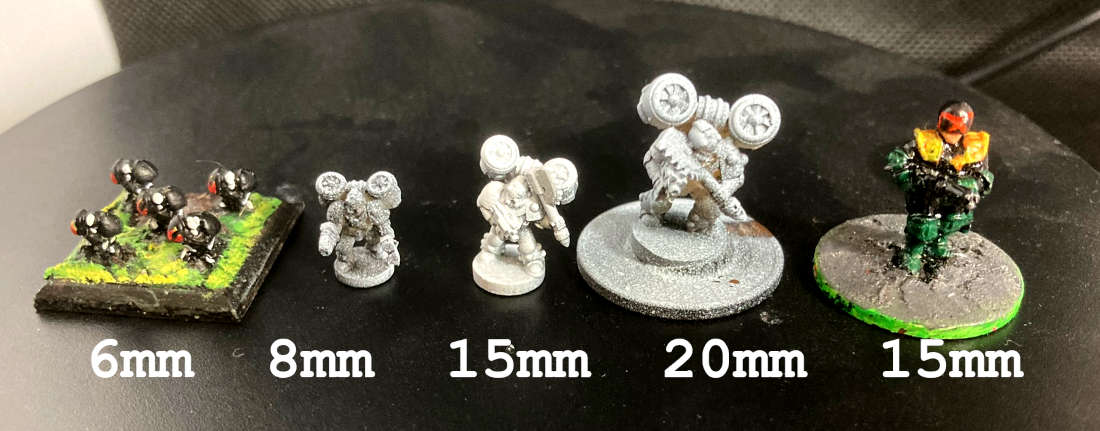
You have got to laugh at the names of some of these files.  These are epic scaled minis which come in a variety of poses and helpfully in groups of 3 & 5 so printing a whole squad is easy.  straight onto the build plate they are about 10mm so I scaled them up 125% to 15mm but they were still too small for my Judge Dredd miniatures which are about 17mm tall so I upped it to 20mm.

Epic vs 15mm scale comparison

These should work well in my games and I have some cool ideas for some encounters which require this type of armoured set up.  

Painting up a Holocaust Squad

Once I had superglued them to 1p pieces and primed them, I gave my squad a quick once over with Gravelord Grey Speed Paint from army painter.  Jet Packs were trimmed in yellow and I gave each one a different coloured helmet and shoulder pad to aid in discrimination on the field of battle.

Judge Dredd Holocaust Squad 15mm

Holocaust Judges are rarely seen in Mega City One, their deployment being reserved for those extreme moments when the ultimate sacrifice is required.  Their ranks are typically made up of those Judges close to retirement or have in some way disgraced themselves in the line of duty.  This final act of service is seen as a suitable punishment or alternative to the redemption of The Long Walk into the Cursed Earth. 

Epic Scale Imperial Heavy Tank - Cults 3D

I had a copy of the original Epic Space Marine game Adeptus Titanicus back in the days of Games Workshop Large Boxes.  So I wondered, just for funzies, how well these newfangled 3D prints would stack up against my vintage epic armour.

Epic Armour vs Tiny 3D Printed Armour

Pretty good me thinks.

Now I've got to find me a decent Epic sized Mek Quake model for those BIG JOBS! in Mega City One.   

Wednesday 28 February 2024

Jessie's Prints - Episode 36 - Itsy Bitsy Drop Pods

This week, I are mostly been printing... Teeny Tiny Drop Pods!!

Isn't it just the way you wait ages for a commissioned print and two come along at once.  This time it's my work chum Gary who needed some drop pods for an upcoming game of Adeptus Epicus or something like that.  You know the one, the latest hotness from Games Workshop.

StarPorts - P.O.D. (Print on Demand) Droplets - Cults 3D

I don't really have much to say about these other than I managed to get 5 Dreadnought sized pods on one build plate and eight of the smaller unit sized pods on a second.  Print time was about an hour and a half each.

Epicly Tiny Drop Pods

The models came well supported but the packaging of the files was a bit weird.  Extracting the zip file dumped 3 folders on my desktop; a Lychee scenes folder, a supported STLs and an Unsupported STLs.  I was not expecting this and so I thought that the zip file hadn't actually unzipped.  Weird.

I always opt for supported files and as I was leaving these on the support rafts for Gary to get the full experience of removing supports 😂 I didn't bother to check if these were hollow or not.  I assumed that they were solid.  To my surprise, and as you can see in the image above, these were actually hollow which explains why they came out of the wash & cure station a little sticky.  They had actually trapped a huge amount of resin in the hollowed out sections as it effectively formed a cup with nowhere for that resin to drain out of because they print upside down.

If I were printing again I would add my own supports and orientate them so that the unused resin can drain away whilst still being attached to the build plate.  A minor gripe I know but sometimes these things matter.

Anyway, as you can see these are considerably smaller than the full size drop pod for WH40K.  Aint they cute 😃

Wednesday 21 February 2024

Jessie's Prints - Episode 35 - 3 Goblins in a Trenchcoat

This week, I are mostly been printing... 3 Goblins in a Trenchcoat!!

3 Goblins in a Trenchcoat - MZ2450 Patreon 

Our Friday game at Dragons Keep Roleplay Club has seen us sucked through a portal onto one of the levels of hell called Las Infernalis.  Basically this is Disneyland for Demons and I'm sure is going to full of weird and deadly rides, games and equally weird characters.  

Having recently joined the MZ2450 Patreon, imagine my surprise when I stumbled on a recent post containing an STL for this guy!!

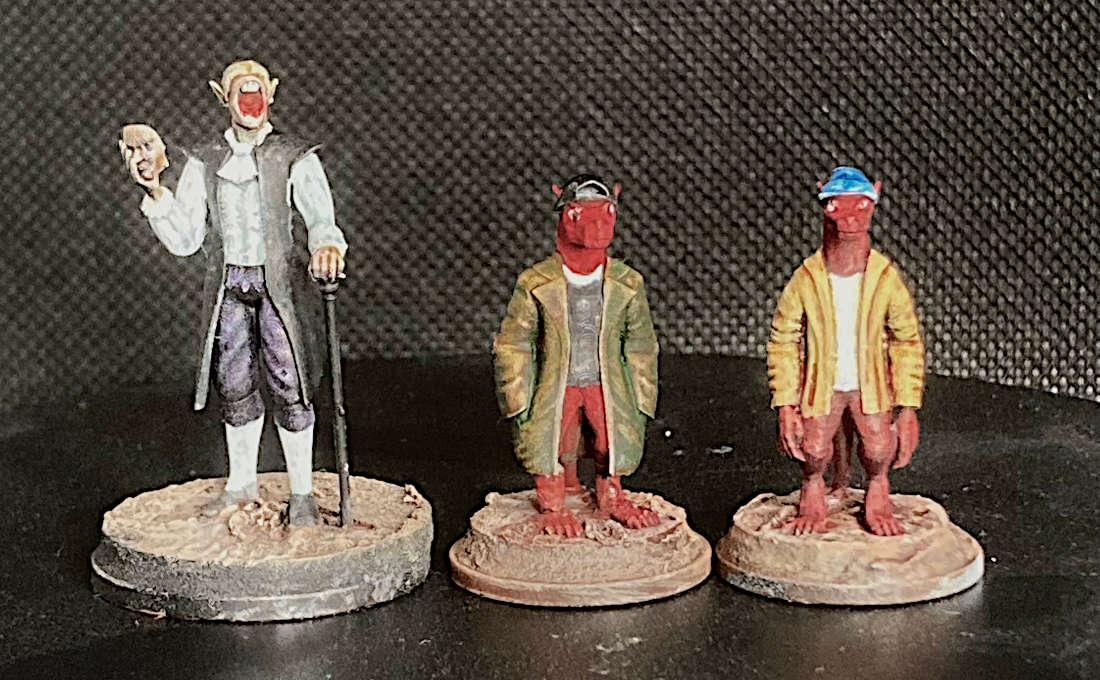
3 Goblins in a Trenchcoat

This is exactly the sort of mini that floats my boat and so I quickly printed and painted him and sent a photo off to Alex the DM.  He's a very amenable sort of chap and we share a love of weird cinema.  His reaction was classic and I expect to bump into this trio of ne'rdowells in the very near future.
 
Miguel also does a version with 5 Wyrmlings in a Trenchcoat which is totally not Tiamat!

Three Halflings in a Trencoat (D&D 5e)

A very creative Reddit user put up a statblock for the 3 Halflings in a Trenchcoat for D&D 5e games.  It would be a very challenging encounter and seems rather overpowered to me.  It is written more as monster statblock and perhaps something that occurs as a consequence of donning a cursed magical trenchcoat which must be filled with 3 of something... Mwahahaha  

Origins of the Totem Pole Trenchcoat Trope

This is one of those prints that irrespective of age we all seem to instinctively have a memory of it from our childhood.  According to TV Tropes this is known as the Totem Pole Trenchcoat but there is no reference to a historical origin.  I seem to remember an episode of Wacky Races or The Perils of Penelope Pitstop where the Ant Hill Mob used this technique.  
 
Fun Fact, the names of the members of the Ant Hill Mob are different in each show.  In Wacky Races they are: Clyde, Ring-a-Ding, Mac, Danny, Rug-Rug-Benny, Willy and Kirby.  Their car is number 7 The Bulletproof Bomb.
  
The Ant Hill Mob

 Whereas in The Perils of Penelope Pitstop they are called, Clyde, Dum-Dum, Softy, Yak-Yak, Snoozy, Zippy and Pockets.  Their car, Chug-a-Boom, is much more of a character in its own right in some episodes of this series,  It gets the classic headlight eyes and is voiced by the late great Mel Blanc  

Ant Hill Mob - Perils of Penelope Pitstop

If you know of any earlier uses of this trope, please feel free to comment in the box below.

Monday 12 February 2024

Jessie's Prints - Episode 34 - Teenage Mutant Sorceror Tortle

This week, I are mostly been printing... A Tortle!!

Epics N Stuff Tortle Sorceror - MyMiniFactory - 109539  

This week saw us return to The Rivenlands D&D Campaign at Dragons Keep Roleplay Club.  My clubmate and fellow founder Paul needed a mini to represent his Tortle Sorceror so he commissioned me to print and paint a supplied STL. 

Tortle Sorceror

He's a chunky boy and basically pyramidal in shape.  The mini came both pre-supported and unsupported, as is common these days.  However, he also came as a pair of pre-hollowed out variants for those wishing to not waste resin or just wanting a slightly lighter mini.  

This is the first time I've seen this done on a 35mm single piece character mini, so I printed a hollow one for shits and giggles.  The only issue I had is that the wall thickness just wasn't thick enough to prevent the odd hole appearing when I removed the supports. 

Painting

The customary zenithal priming was done and mounted to my base of choice (a two pence piece).  I said he was chunky and barely any base was visible under his girthy feet.

Paul supplied me with a photo of a make by Empire of Minis so I didn't even have to make any colour choice decisions. 

Base colours were a mix of Vallejo Acrylics, with midtones dry brushed on before picking out the highlights.

Tortle Sorceror

Serious Skin Problems

I really struggled with the skin on this model, in fact it was practically the last thing that got painted.  The sculpt had no texture and yet he is supposed to be a tortoise like humanoid.  Last time I looked they had pretty scaly lizard like skin and his was as smooth as a baby's bottom.  I have a small collection of greens and they were covering really horribly over the zenithal, particularly where areas of shadow were converned.

Tortle Sorceror


I persevered though and resorted to mixing in a bit of some Crafter's Choice acrylic that I found in a Wallington "Arkwrights" shop.  

Arkwrights Store - Open All Hours
G.. G.. G.. Granville! Fetch me that tube of G... G.. G... Green Paint!

This stuff is so random it doesn't even have a paint name, just a number (PNTA-134) but it's made by Royal & Langnickel and it did the job where my specialist miniature paints could not.  
 
This just goes to show that when you are painting don't just dismiss your art materials because they aren't Vallejo or Games Workshop.  Try out lots of different paints and you just might hit on some secret sauce.

Sunday 11 February 2024

6 Essential Resin 3D Printer Accsessories

I have been resin 3D printing for almost 2 years now and here are a few of the bits of kit which I have found to be invaluable.

Essential Resin 3D Printing Accessories

Plastic Razor Blade Scrapers 

Nothing gets a blob of resin off your LCD screen better than a plastic scraper.  They don't damage the surface and they are cheaper than actual razor blades.  You can also use them to pry your prints off the build plate and they are disposable so no need to clean them.

Once you have these, you will find they have a multitude of uses around the house for all those DIY projects that they were actually designed for.

Spare FEP film

You never want your printing to be sidelined by a dodgy FEP, so having a spare film is essential for when the inevitable happens.  Changing out your FEP is just one of those skills you will need to master.  Some say that you can tune your FEP for optimal performance, but I just use the German specification gudentight.    I recommend buying from 3DJake.

3D Printer FEP Film

Fun Fact: FEP is an acronym for Fluorinated Ethylene Propylene.

Silicone Baking Tray

Resin 3D printing is a messy affair, particularly when you are extracting your prints from the build plate.  It is hard to not drip uncured resin onto your table, so I use a silicone baking sheet as a table protector.  

Nothing sticks to silicone and these mats are super easy to clean and so cheap that you can cover an entire table in the things and still have change from a tenner (£10).

PTFE Lubricant (GT85)

Every now and then you will suffer from a print that just wants to stick to the FEP rather than where it is supposed to stick, the build plate.  The best thing I have found to combat this is to give your FEP a good spray with GT85 and a gentle rub down.  This creates a microscopic PTFE layer on the surface of your FEP guaranteeing that the print will release when the build plate rises.

Everytime I change resin, change my FEP or just engage in a spot of cleaning, I give my FEP a liberal coat and then buff it dry.  GT85 will change your success rate instantly, no more failed prints, bits stuck to the FEB or layer peeling.
Plastic Funnels & Conical Paint Filters

Trying to pour your unused resin back into the bottle is a nightmare task made tolerable with the use of a funnel.  Get some conical paint filters to strain out any bits of cured resin and your life will be so much easier and less messy.

The pound store is your best bet for funnels.  You can get a bunch of filters for pennies at the usual online retailers like eBay or Amazon.  A big shout out to Jayo3D who pack 2 or 3 filters in with their 1Kg bottles of resin.

Two Wash & Cure Station Tanks 

It wasn't long into my resin 3D printing journey before my wash tank looked like a winter's morning.  This occurs when the uncured resin suspended in your IPA cures and fall to the bottom of the tank making an amorphous plastic blancmange.  Honestly, this stuff is horrendous to deal with, so having a second wash tank that you can decant into and clean your IPA is a must.  I have found that running a few curing cycles on an empty tank can work wonders. 

Thursday 1 February 2024

Jessie's Prints - Episode 33 - The Girl with the Robot Hand

This week, I are mostly been printing... A girl riding a robot hand!!

Trix Robot Rider - Cults 3D 

I found this on EthanTSavage's Cults 3D page and thought it was an awesome sculpt.

Trix Robot Rider

The aesthetic is undeniably Anime, and for me is reminiscent of the fabulous Tank Girl comic of the 80s.  Whilst the movie ranks as one of the worst in history, I am a big fan.

Trix Robot Rider

I love Giant Robot anime, my favourite being Giant Robo: The Day the Earth Stood Still.  If you haven't watched it you should it's just the right shade of bonkers to make a strange sort of sense and is a blend of diesel punk / magical superhero anime which is incredibly rare.

Trix Robot Rider

This was a very quick model to make taking me only a few days to complete.  I used a skull base which I had originally intended for my huge demon model and slathered on the old poundland polyfilla to form a crust over the skulls. 

Trix Robot Rider

This is my homage to the famous scene in Terminator 2 where the T800s are walking across the field of human remains crushing skulls underfoot.

Saturday 27 January 2024

Jessie's Prints - Episode 32 - Cowboy Bebop Spike Spiegel Swordfish II

This week, I are mostly been printing... The Swordfish II

Cowboy Bebop Swordfish II - Thingiverse: Thing 3082811

Anime fans will instantly recognise Spike Spiegel's red starfighter the Swordfish II.

Cowboy Bebop Swordfish II

This is an older file designed for FDM printing and is therefore a abit on the low-poly end of the spectrum  but it is very well put together all the same.

Meet the Parts

I opted to print this on my Resin SLA printer and I was mindful of the large size of the model.  The main core of the ship needed to be split in two using meshmixer and I took the opportunity to learn how to use the hollow functions. 

I couldn't believe how easy this was and it's definitely something I will be using in the future when I make larger objects as I reckon it saved a metric ton of resin and didn't lead to those peeling and splitting issues I experienced when printing my 3D Printed Akira - Kaneda Bike.

Cowboy Bebop Swordfish II

Sub Assembly

Once I had worked out what parts I needed and got them all printed to my satisfaction, I began gluing up the sub assemblies.

The core body and nose were split in meshmixer so needed to be joined back together.  Despite a really good print whenever I use mesh mixer I need to putty the seams.  The hollowed out core and nose also needed the drain holes filled and sanded.  I then doubled pinned the wings to this main assembly.  In hindsight I should have spent more time on this as there was a little bit of an alignment issue between the wing root and the wing itself.


The back half of the model was an utter nightmare of badly fitting airfoils and I bodged as best I could.

The cannon barrel, cockpit and reversing gear were painted using various colour shift paints and left until final assembly   

This was all given a solid black primer with my go-to rattle can matt black car paint from Poundland.

Panel Scribing and Underpainting

I knew I was going to want to try out the underpainting technique I've seen a lot of AFV modellers use to create their panel lines, but this model didn't really have any.  I dug out a ruler and scribed the aileron's and the folding wing joins with the back of an x-acto blade.  The rivet detail was simply drilled with a pin vice and a few other panel lines added.  This was all recoated in black ready for underpainting.

I used a Daler Rowney FW artists white ink straight out of the bottle through the airbrush.  I'm a pretty novice airbrusher and I have always struggled with thinning and getting the right consistency of paint and prerssure to prevent spidering.  

However, this ink added the new complication of fisheyes.  I'm not sure if it is the ink or the undercoat, but it was a real pain.  Several coats went on and some had to be wiped off.  I persevered and finally it was time to add the red coat. 

Weathering and Paint Chipping

The Swordfish is an old ship and given the meagre budget that the crew of the Bebop operate with, there is only the money to do basic maintenance.  A scuffed up worn out appearance was a must.

I use the sponge chipping method lightly dabbing some black on all the leading edges that would take the most punishment on re-entry.  This was then highlighted with some bright silver from Army Painter.

A simple but effective method to weathering whilst maintaining a clean look and not taking an age to dry.

Spike Spiegel - MyMinifactory

No model of the Swordfish II would be complete without it's pilot and the main hero of the show, Spike Spiegel.

I found a lovely model of Spike on MyMiniFactory which was a breeze to print and paint.  I think it makes a great addition to the model.  Shout out to sculptor EthanTSavage whose work is prertty amazing and scales up really nicely. 

The Base

I considered lighting this model but to be honest it was a bit of a pain once assembled.  I had a plan for routing the LEDs to the engine and the two spotlights on the nose, but I was not confident that the effect would be worth it given the low-poly detail of this model.  

I did want a modern looking base and found the perfect match in a box style frame in a thrift store.  Removing the glass and gluing the mdf backer in place proved a sturdy enough platform for a coathanger to be glued in place supported by a generous volcano of milliput on the underside.

I also took the liberty of drilling an extra hole in the corner for Spike to be glued in place.

The Swordfish II Plaque - Thingiverse: Thing 6455107

One of the more iconic graphical elements to the show is the logo.  I love the big kanji script but wanted the center to bear the name of the ship.  I found a suitable image online and modified it with GIMP.  I then converted the JPG to an SVG using Convertio and imported this into Tinkercad.  I added a simple solid back to the object and exported as an STL.  

From start to finish this took no more than 10 minutes.  You can download the STL file for free using the Thingiverse link above.

Many Thanks to...

A big shout out to Lou Dalmaso aka Aztek Dummy on YouTube.  I've thoroughly enjoyed his forays into 3D printed models and it was his channel that inspired me to give it a go myself.  

Big thanks also to the rest of the Youtube modelmaking community for giving me hours of enjoyable content over the years. Plasmo, Mr E Models, SpruVerse, World of Wayne, TrekWorks, Interstellar Modeler, Boylei Hobby Time, Luke Towan, MSPaints, Squidmar, Ground Affected, Midwinter Minis and so many more...

Tuesday 23 January 2024

Jessie's Prints - Episode 31 - The Ultimate Radical Centrist Demon Dude

This week, I are mostly been printing... A bloody great big Demon Bloke!!

Before anyone asks, my opinion on the Warhammer 40K and Games Workshop IP issue is, that I don't believe in direct recasts of currently available models. However, if you can sculpt something that is an homage to an existing IP or if the original miniature is out of production then I say it's fair game.  Imitation is the sincerest form of flattery after all.

The Ultimate Radical Centrist - Cults 3D

I can't remember how I managed to find this model but I'm bloody glad I did.  I don't play WH40K or typically use many demons in my own RPGs, but this was a love at first sight sort of thing.

The Ultimate Radical Centrist B'lakor

Printing the body parts on my relatively small Photon Mono X was easy.  However, his wings were a challenge and I had to once again turn to meshmixer in order to slice them in half and even then they only just fit onto the print bed.  Even though the flat mating surfaces were printed flat on the build plate a good deal of sanding was required to join them together.  the discrepencies were filled with milliput original to make them seamless and whole again.

I wanted the wings to be detachable for transport and so I pinned them with coathanger wire.  Unfortunately they were so heavy and unbalanced that one pin made them rotate so a second finer pin was added.  If I were to do this again I would seriously consider adding some mini magnets.

The Ultimate Centrist B'lakor

The included base was insufficient for this quite top heavy model and so I printed a circular one on my FDM printer.  A square socket was carved out and the original base epoxied into place.  This was then covered in my go-to basing medium poundland wall filler.

Painting 

Painting was a game of two halves.  The body got the traditional zenithal, airbrush base colours, washes, highlights and dry brushes treatment.  For the wings I wanted something "Draconic" so I primed in black and then a layer of gloss varnish on the outside of the wings.

Ultimate Radical Centrist B'lakor

The outside surface is curves and I managed to stretch an old orange bag (the plastic mesh netting type) and used this as a mask.  This is the same technique that the Kustom car painters use when they paint the roofs of lowriders using lace table cloths.  I decided to go with the orange to violet colour shift paint from the Valleho "Space Dust" set.  

The Ultimate Radical Centrist B'lakor

This was a great base but needed a silver highlight at the top edge to pick out the scales.  In hindsight using the gloss layer was a mistake.  It was a nightmare task to pick out the top edges of the colourshift in some parts of the model due to the reflected light 

The Ultimate Radical Centrist B'lakor

The inside wings got a more muted leathery treatment with progressively lighter shades of brown through the airbrush and the finger spines were left darker.

Playtime 

Since printing him, he has debuted as the big bad in a game of Dark Heresy RPG at Hobbits Hole Roleplay Club.  I'm sure that he will also make an appearance towering over the streets of Mega City One in a prog in the not too distant future...